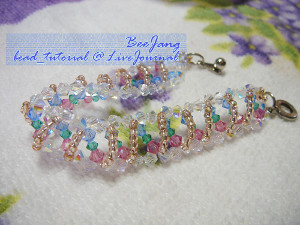
Coiled Wire Daisy Bracelet

This is one wild wire bracelet pattern! The Coiled Wire Daisy Bracelet is the only accessory you'll want on your wrist all spring and summer long. If you're looking for new ways to make bracelets, this one will definitely set the wheels of inspiration spinning. This tutorial puts a new twist on the classic daisy chain pattern. Learn how to make bracelets by linking up colorful coiled wire daisies with these innovative instructions. You've probably never seen a bracelet project like this one before, and the end result is definitely worth the wirework! This wire jewelry project is really one of a kind.
Project TypeMake a Project
Bead TypePearl, Miscellaneous
Time to CompleteIn an evening
Bead Technique UsedChainmail/Wirework
Bead Project TypeBracelet

Materials:
- Coiling Gizmo® Deluxe Winder
- Jewelry pliers- Flat nose, Chain Nose, Round Nose, Flush Cutters, Nylon Jaw Pliers
- Various colors of 24-ga and 22-ga Artistic Wire®
- 10mm beads, for the centers of your daisies (Make sure that 22-ga wire can go through the beads)
- 8mm - 10mm jump rings
- Clasps
- Extension chain if needed
Instructions:
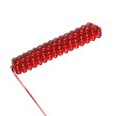
Make a Coiled-Coil:
-
Using a length of approximately 60 inches of 24-ga wire, make a 4.5-inch long coil on the 1.6mm diameter mandrel (second to smallest mandrel in the Coiling Gizmo® Deluxe Winder).
-
Take the coil off the mandrel and trim off excess wire.
-
Cut a 15-inch length of 22-ga wire of the same color.
-
Using the same mandrel as in step 1, secure the 22-ga wire onto the mandrel and make one coil.
-
Thread the 4.5-inch coil you made in step 1 onto the 22-ga wire still attached to the mandrel.
-
Push the coiled wire up to the mandrel and coil it (with the 22-ga wire inside of it) approximately 16 times around the mandrel.
- Remove the coiled-coil off the mandrel. DO NOT CUT the wires yet.
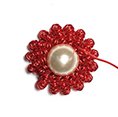
Create the Daisy’s Petals:

-
Trim off the excess wire (the wire tail attached to the mandrel), leaving the longer remaining wire on the opposite side of the coiled-coil intact.
-
Thread the remaining 22-ga wire through the opposite side of the coiled-coil you just created.
-
Pull and tighten the wire thus, forming a circle of coiled-coil wire. This is the “petals” of your daisy.
- Adjust the coils so that they are evenly distributed throughout the circle.
Complete the Daisy:
-
For the center of the daisy, thread a 10mm bead onto the remaining 22-ga wire and carry the wire over to the opposite side of the daisy.
-
Wrap the wire once around the opposite side.
-
Secure the remaining wire by wrapping it twice around the wire that the bead is strung onto (inside the coiled-coil circle).
-
Trim off any excess wire.
Making the Bracelet:
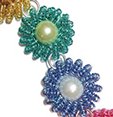
- To connect the wire daisies, use 8-10mm open jump rings and/or wire wrapped beads.
Read NextWoven Beads Friendship Bracelet
Your Recently Viewed Projects
Thanks for your comment. Don't forget to share!
mebaez1957 6677517
Jun 09, 2013
I agree with everyone. The instructions are very confusing. I think that if an instructional video accompanied the instructions everyone would be able to follow and create this beautiful and interesting bracelet.
dmrupp67
Jun 08, 2013
i agree with wibb and starshine. very confusing directions. need to better explain or show diagram of coiling the 22 gauge wire coil into the 24 gauge coil.
starshine20012000 7048450
Jun 08, 2013
From step 3 onwards I couldn't understand what to do, some diagrams would be useful x
Report Inappropriate Comment
Are you sure you would like to report this comment? It will be flagged for our moderators to take action.
Thank you for taking the time to improve the content on our site.