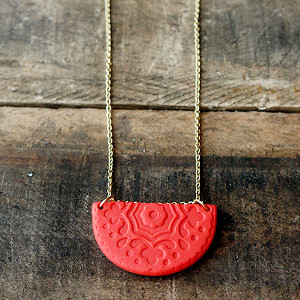
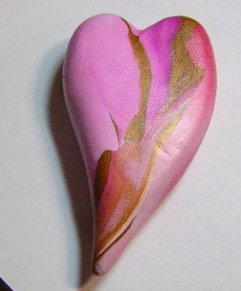
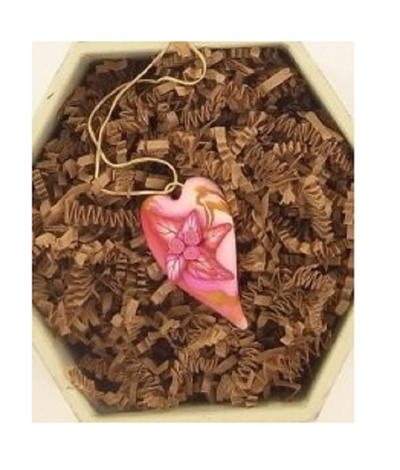
Dynamic Heart Pendant

There's so much to keep the eye moving with this Dynamic Heart Pendant! Polymer clay jewelry making allows you to create any shapes and designs your heart desires, and this pendant is one imaginative project. It's sure to ensnare the attention and capture the heart of all who lay eyes upon it! The swirls of gold and pink give this pendant a gorgeous finish. Once your DIY pendant is ready, string it onto a cord or chain to make it a stunning homemade necklace.
Project TypeMake a Project
Time to CompleteIn an evening
Bead Project TypeNecklace

Materials List
- Clay:
- Premo! Sculpey®: Pomegranate - 2 oz (2 blocks)
- Premo! Sculpey®: Fuchsia - 2 oz (2 blocks)
- Premo! Accents: Gold - 2 oz (2 blocks)
- Premo! Sculpey®: White - 2 oz (4 blocks)
- Tools:
- Clay Conditioning Machine
- Sculpey® Clay Mat
- Sculpey® Etch ‘N Pearl
- Sculpey® Super Slicer
- Additional Supplies:
- 6mm jump ring
- Cord for stringing
Getting Started:
Do not use unbaked clay on unprotected furniture or finished surfaces. Start with clean hands and work surface area. Good work surfaces include wax paper, metal baking sheet, or disposable foil. Knead clay until soft and smooth. For best results, clean your hands in between colors. Shape clay, pressing pieces together firmly. Bake on oven-proof glass or metal surface at 275 °F (130 °C) for 30 minutes per 1/4” (6 mm) thickness. For best baking results, use an oven thermometer. DO NOT USE MICROWAVE OVEN. DO NOT EXCEED THE ABOVE TEMPERATURE OR RECOMMENDED BAKING TIME. Wash hands after use. Baking should be completed by an adult.
Begin by preheating oven to 275 °F (130 °C). Test temperature with oven thermometer for perfectly cured clay. For best results, condition all clay by running it through the clay dedicated pasta machine several passes on the widest setting. Fold the clay in half after each pass and insert the fold side into the rollers first.
Instructions:
-
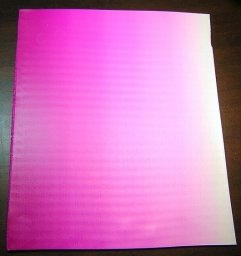
Using the Clay Conditioning Machine on the #1 setting, make a sheet of the White, Gold, Fuchsia and Pomegranate. Always work light to dark to avoid color transfer. Set the Gold clay aside.
Cut the White sheet in two equal parts. Using the Super Slicer, cut the sheets in half to make triangles and stack the triangles on top of each other. You will have two triangles of the Fuchsia and Pomegranate and four of the White. Put one stack of each color opposite the White, forming a new sheet. You will have two sheets now – one White/Fuchsia and the other Pomegranate/White.
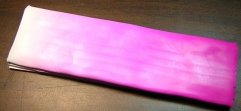
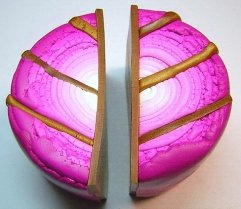
Fold the White/Fuchsia clay sheet in half so that the white corner touches the opposite white corner and the fuchsia corner touches the opposite fuchsia corner. Leading with the folded edge, press the folded sheet back through the Clay Conditioning Machine on the #1 setting. Keep folding the sheet and pressing it back through the machine at least 25 times or until the colors are blended all the way across. It is important during this step to always fold White corner to White corner and Fuchsia corner to Fuchsia corner. Once your sheet is completely blended, trim the edges and set the extra clay aside. This is called a Skinner Blend. -
Fold the sheet twice lengthwise and turn the sheet 90 degrees so that the white runs through the rollers first. Press the sheet through the Clay Conditioning Machine on the #1 setting. Repeat without folding the sheet again on the #3 setting. This will make the sheet very long and thin and the color blending even more gradual.
-
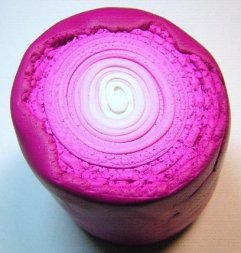
Starting on the white end of the sheet, roll the sheet completely up jelly roll style with the White in the middle and the Fuchsia on the outside. This will be your first leaf cane.
-
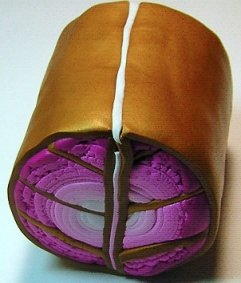
Run the Gold clay through the Clay Conditioning Machine on #1 and then #3 settings. Using the Super Slicer, cut the cane into four pieces. Line one side of each piece with gold.
-
Put the cane back together and cut the roll diagonally. Line each half with Gold; then turn one side over to create a chevron flip. Create a strip of clay with the remaining Gold and line the outside of the cane.
-
Line up the end of the strip at the top of the leaf; roll the gold onto the cane, stopping just short of touching the starting end. Cut a thin strip of White and place it in the opening so that you have a guideline when you reduce the cane.
-
Repeat this whole process to create the white and pomegranate leaf cane.
-
Take the leftover White, Fuchsia and Pomegranate clays and make small sheets. Run each color through the Clay Conditioning Machine on the #3 setting. Stack the colors and roll them into a small jelly roll cane.
-
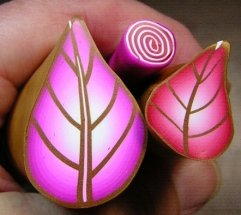
Reduce your leaf canes and jelly roll cane to the size you want to use and form into a leaf shape. The White line at the top will ensure that your leaves are not distorted. You can reduce the cane to various sizes so you have some variation in your leaves.
-
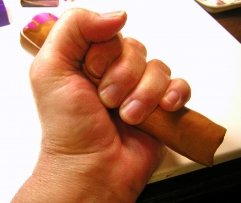
To reduce your canes, start by squeezing them in your hands to soften and lengthen them.
-
Then, roll them on your work surface with both hands, slowly working your hands apart until the cane reaches the length and width you want.
-
Use your thumb and index finger to pinch the top of the cane, following the White line, to shape your cane into a leaf shape.
-
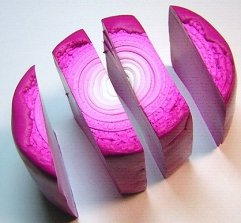
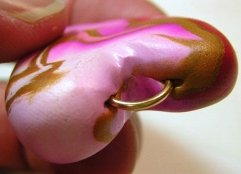
Using the Super Slicer, cut off the ragged ends of each cane. You will use these scraps to form your heart. Roll the scrap into a ball about 1 inch in diameter and then into an oval. Point one end and flatten slightly. Use the Etch 'N Pearl to make an indentation in the top of the oval to form the heart shape.
-
Embed the jump ring in the indentation and pull clay over it to secure the ring.
-
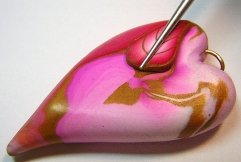
Cut thin slices of the leaves and jelly roll canes: two slices from the large leaf cane, four slices from the smaller leaf cane, and three slices from the jelly roll cane.
-
Arrange the canes in a way that is pleasing to you. We like to make a "splash" of leaves that radiates out from a central point. Use your Etch 'N Pearl tool to secure the cane slices. When you have your heart the way you want it, bake it as directed above.
-
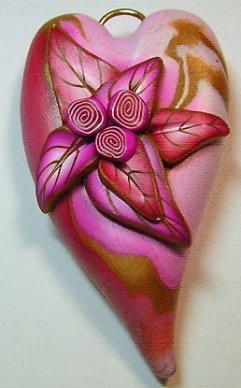
Allow the heart to cool completely. You can hang this heart on a ribbon, cord or chain, or make it the focal point of a beaded necklace.

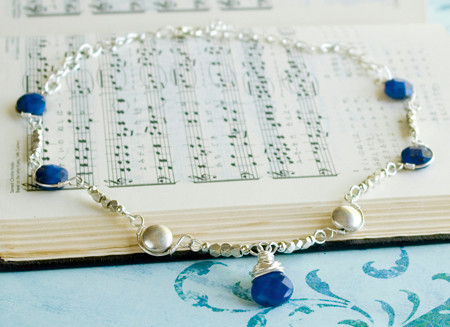
Read NextRustic Sea Foam Faceted Bracelet
Your Recently Viewed Projects
Thanks for your comment. Don't forget to share!
Report Inappropriate Comment
Are you sure you would like to report this comment? It will be flagged for our moderators to take action.
Thank you for taking the time to improve the content on our site.