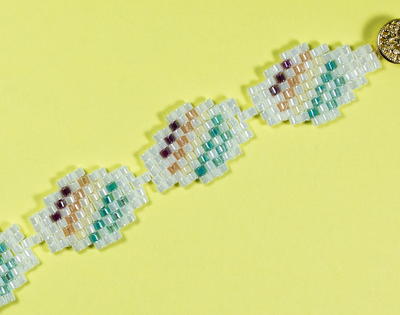
Chianti Classico DIY Bracelet

This Chianti Classico DIY Bracelet is a Tila bead bracelet for formal occasions, casual outfits, and more! Choose your favorite Tila seed beads to make this stunning beaded bracelet. With glamorously iridescent square beads and crystal picots, this DIY jewelry accessory is the bracelet equivalent of your little black dress. This free bead weaving pattern takes you step by step through the process of creating this enchanting bracelet pattern yourself. What will you wear it with?
NotesA variation of square stitch is used to weave this bracelet with two-hole Tila beads.
Project TypeMake a Project
Bead TypeGlass, Seed
Time to CompleteIn an evening
Bead Technique UsedStitched
Bead Project TypeBracelet

Materials List
- 3 grams - Size 11 Silver Lined Dark Amber AB Round Japanese Seed Beads (SB1639)
- 15 grams - 5mm Metallic Golden Wine Rainbow 2 Hole Tila Seed Beads by Miyuki (SB3936)
- 74 - 3mm Fuchsia Swarovski Elements Crystal Bicone Beads (03BI1107)
- 2 - 6mm Fuchsia Swarovski Elements Crystal Round Beads (06RD0109)
- 1 - Smoke Gray FireLine Braided Bead Thread .008 diameter, 6 lb/Size D (SM1001)
- Size 12 Pony Beading Needles (TL2382)
- Synthetic Beeswax, 2 ounces (TL1026)
- Beading Scissors, 1 1/4 inch Blade (TL0302)
- Perfect End Thread Burner
Instructions
-
Thread a needle with 5 feet of beading thread (add new thread as needed). Wax the thread.
-
Using square stitch with Tila beads, begin weaving the first row in the following manner: String one hole (it will be the left hole) of one Tila bead, then through the second (right) hole of the same bead, leaving an 8-inch tail. Tie a square knot with the tail and working thread.
-
String one (right) hole of one Tila bead, then pass through the second (left) hole of the bead just strung and the left hole of the previous bead. Pass through the right holes of both beads.
-
Repeat Steps 2 – 3 twice, forming a four-bead row. The first row is complete.
-
Row 2: String one hole of one Tila bead. Pass through the right hole of the bead just exited and the left hole of the bead just added. Repeat this step to the end of the row. Pass through the right hole of the bead just added and the right holes of all beads added in this row.
-
Repeat Step 5 for a total of 7 inches or the desired length.
-
After completing the last row, exit through a Tila bead on the end of the row through the hole closest to one end of the bracelet.
-
Form a picot fringe by stringing one size 11 seed bead, one 3mm Fuchsia crystal bicone bead and one size 11 seed bead. Pass down through the second hole in the same Tila bead, and back up through the closest hole in the adjacent Tila bead.
-
Repeat Step 8 for the length of the bracelet.
-
When you reach the opposite end of the bracelet, pass through all four Tila beads in the end row, exiting the last Tila bead on the end of the row.
-
Repeat Step 8 for the length of the bracelet on the opposite edge.
-
To form the button clasp; exit from between the first and second beads on the end row. String four size 11 seed beads, one 6mm Fuchsia crystal round bead and one size 11 seed bead. Pass back down through the crystal and the first four seed beads.
-
Pass through the second and third Tila beads in the same row, and exit from between the third and fourth beads. In the same manner as in Step 12, attach a second button clasp.
-
Weave back and forth through several rows to reinforce. Trim the thread, and burn the thread end with a Perfect End Thread Burner.
-
On the opposite end of the bracelet, anchor a new thread near the end row or use the remaining tail thread. Exit from between the first and second beads on the end row.
-
String 19 size 11 seed beads, and pass back through the first four seed beads strung, forming a loop. Weave back through one hole in one Tila bead, back through the second hole of the same Tila bead, returning to the same exit point as in Step 15. Reinforce the loop by retracing the thread path. Weave through the second and third beads, and exit from between the third and fourth beads.
-
In the same manner as in Step 16, form a second loop to align with the second button.
-
Repeat Step 14.
Read NextSquare Stitch Patchwork Cuff
Your Recently Viewed Projects
Thanks for your comment. Don't forget to share!
mulberrygalprinces s
Jun 20, 2017
It must be because I am still new at this but the instructions don't seem clear to me. I had hoped for a diagram, pictures or video. This is way beyond me. Like the old Rowan and Martin Laugh In Show use to say, you lost me at the bakery!! Maybe when I get more experienced this will make better sense to me so I am keeping it in my saved box.
Editor EK
Jun 21, 2017
Hello mulberrygalprincess, Thank you for your feedback! We will keep visual aids in mind when we add future full projects to the site. -Editors of AllFreeJewelryMaking
The Designing Peng uin
Jul 20, 2016
Love the bracelet and love the rich warm colours - everything blends together in wonderful richness. The design is accompanied with clear instructions that are easy to follow leading to a finished product that is attractive and adds colour and style to the moment and the outfit
Report Inappropriate Comment
Are you sure you would like to report this comment? It will be flagged for our moderators to take action.
Thank you for taking the time to improve the content on our site.