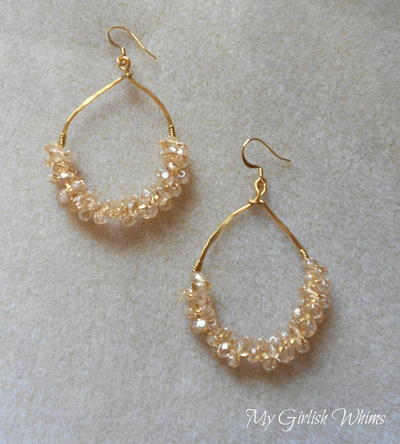
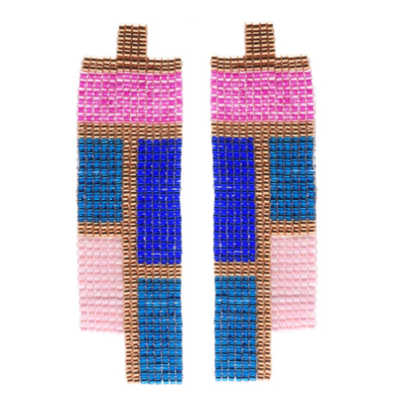
Deco Darling Earrings

If you're looking for free seed bead earring patterns to make a statement with, look no further than these Deco Darling Earrings. The gorgeous geometric design in these earrings recalls the bold art deco style of the 20s and 30s.
Project TypeMake a Project
Bead TypeSeed
Time to CompleteIn an evening
Bead Technique UsedStitched
Bead Project TypeEarrings

Materials List
- Miyuki Delica Seed Beads 11/0 'Galvanized Gold' DB411 7.2 Grams
- Miyuki Delica Seed Beads 11/0 'Light Fuchsia Lined Crystal AB' DB074 7.2 Grams
- Miyuki Delica Seed Beads 11/0 Silver Lined Sapphire DB047 7.2 Grams
- Miyuki Delica Seed Beads 11/0 Silver Lined Blue Zircon DB608 7.2 Grams
- Miyuki Delica Seed Beads 11/0 Pink Lined Crystal AB DB055 7.2GR
- Gold Plated Flat 6mm Glue On Earring Posts
- Gold Tone Hypo Allergenic Bullet Clutch Earring Backs
- Wildfire Thermal Bonded Beading Thread .006 Inch - White
- E6000 Industrial Strength Glue Adhesive
Featured In:
Instructions
-
Before you begin, watch the video: How to do Square Stitch Bead Weaving. This video will demonstrate the stitch that will be used to create these earrings. Also watch the video: How to Tie Off and Add New Thread in Bead Weaving. You will need to use the techniques shown in this video while weaving this project.
-
Begin by threading a size 12 beading needle with .006" white Wildfire thread and working two rows of square stitch 14 beads wide, using size 11/0 galvanized gold Miyuki Delica beads.
-
Continue by working six rows 14 beads wide using size 11/0 light fuchsia lined crystal AB Miyuki Delica beads.
-
Work two more rows 14 beads wide using the galvanized gold beads.
-
Work the next row by adding 6 size 11/0 silver lined blue zircon Miyuki Delica beads, then two galvanized gold beads, then 6 size 11/0 silver lined sapphire Miyuki Delica beads.
-
In the next row, add 6 silver lined sapphire beads, two galvanized gold beads, and 6 silver lined blue zircon beads.
-
Repeat steps 5 and 6 four more times.
-
Work the next row by adding 8 galvanized gold beads and then 6 silver lined sapphire beads.
-
In the next row, add 6 silver lined sapphire beads and then 8 galvanized gold beads.
-
In the next row, add 6 size 11/0 pink lined crystal AB Miyuki Delica beads, then 2 galvanized gold beads, and then 6 silver lined sapphire beads.
-
In the next row, add 6 silver lined sapphire beads, then 2 galvanized gold beads, and then 6 pink lined crystal AB beads.
-
Repeat step 10.
-
Work the next row by adding 6 pink lined crystal AB beads and then 8 galvanized gold beads.
-
Work the next row by adding 8 galvanized gold beads and then 6 pink lined crystal AB beads.
-
In the next row, add 6 pink lined crystal AB beads, then 2 galvanized gold beads, and then 6 silver lined blue zircon beads.
-
In the next row, add 6 silver lined blue zircon beads, then 2 galvanized gold beads, and then 6 pink lined crystal AB beads.
-
Repeat steps 15 and 16 twice, and then step 15 once more.
-
The rest of the rows will only be 8 beads wide. Work the next row by adding 6 silver lined blue zircon beads and then 2 galvanized gold beads.
-
Repeat the last row 5 times.
-
With a new thread, bring your needle through the first 6 beads on the top row. Work a row of square stitch off of the top row 4 beads wide with galvanized gold beads. This row should be centered over the top row with 5 beads to either side.
-
Work 3 more rows as in step 20.
-
Tie off and weave in all of your threads.
-
Apply a small amount of E6000 glue to the glue on pad on a gold plated 6mm flat pad earring post. Center it on the back of the last little 4x4 area of weaving that you completed and press into place. Make sure when you glue your second earring post on that you glue it onto the other side of your second woven piece so that your two earrings are mirrored.
-
Allow the glue to dry for at least 24 hours, and then attach a gold tone bullet clutch earring back to the post.
Read NextDeco Darling Earrings
Your Recently Viewed Projects
Thanks for your comment. Don't forget to share!
mulberrygalprinces s
Jun 11, 2017
Now these are really different and very nice. I also love the color combination. And after looking at the directions it does not seem too hard either. And I am always up to learning a new craft. I just keep leArning new things here at this site. If I had to pay for all the books and instructions I would be bankrupt. I can't thank you enough for all of them.
acehigh1978 523960 7
Feb 05, 2013
Awesome ,I am Defo going to give this one a go ,well done and thank you very very much
Report Inappropriate Comment
Are you sure you would like to report this comment? It will be flagged for our moderators to take action.
Thank you for taking the time to improve the content on our site.