Tuxedo Friendship Bracelet Pattern

Tuxedo Friendship Bracelet Pattern
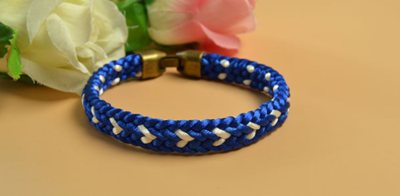
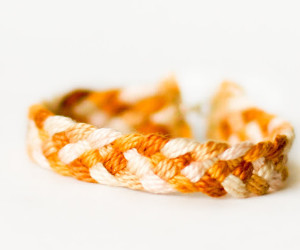
The alternating chevron and dot design on this bracelet makes it look like the collar and buttons on a suit. This clever Tuxedo Friendship Bracelet Pattern will show you how to use macrame knots to make one of your own. It's one stylish bracelet!
Project TypeMake a Project
Time to CompleteUnder an hour
Bead Project TypeBracelet

Notes:
- Before you begin making your friendship bracelet, you should know how to make a Right Hand Double Knot, Left Hand Double Knot, Single Right Single Left Hand Knot and Single Left Single Right Hand Knot. You can see these instructions at myfbm.com.
- These instructions teach you how to complete the pattern using My Friendship Bracelet Maker. However, the pattern can be completed without the loom as well.
Instructions:
-
Pick 4 different colors. (The example uses purple, lt. blue, black and white). You will need 1 strand of purple, 1 strand of lt. blue, 1 strand of black and 1 strand of white.
-
Align string, fold in half, and tie knot ½ inch from fold forming a loop.
-
Attach your ½ inch loop to MYFBM under the butterfly clip.
-
Separate strings by placing one string per slot. Note: Use the same color in slots 2 & 9 (purple), slots 3 & 8 (lt. blue) & slots 4 & 7(white) & slots 5 & 6 (black). This will align the colors of your bracelet pattern. This pattern will start off like the arrow pattern.
-
To begin, take string #2 (purple) and make 3 right hand double knots. One each, on string #3 (lt. blue), string #4 (white) and string #5 (black). String #2 (purple) will now be in slot 5.
-
Take string #9 (purple) and make 4 left hand double knots. One each, on string #8 (lt. blue), string #7 (white), string #6 (black) and string #5 (purple). String #9 (purple) will now be in slot 5.
-
Take string #2 (lt. blue) and make 3 right hand double knots. One each, on string #3 (white), string #4 (black) and string #5 (purple). String #2 (lt. blue) will now be in slot 5.
-
Take string #9 (lt. blue) and make 4 left hand double knots. One each, on string #8 (white), string #7 (black), string #6 (purple) and string #5 (lt. blue). String #9 (lt. blue) will now be in slot 5.
-
Take string #2 (white) and make 3 right hand double knots. One each, on string #3 (black), string #4 (purple) and string #5 (lt. blue). String #2 (white) will now be in slot 5.
-
Take string #9 (white) and make 4 left hand double knots. One each, on string #8 (black), string #7 (purple), string #6 (lt. blue) and string #5 (white). String #9 (white) will now be in slot 5.
-
Take string #2 (black) and make 3 right hand double knots. One each, on string #3 (purple), string #4 (lt. blue) and string #5 (white). String #2 (black) will now be in slot 5.
-
Take string #9 (black) and make 4 left hand double knots. One each, on string #8 (purple), string #7 (lt. blue), string #6 (white) and string #5 (black). String #9 (black) will now be in slot 5.
-
Take string #2 (purple) and make a single right single left hand knot with string #3 (lt. blue). String #2 (purple) will remain in slot 2.
-
Take string #3 (lt. blue) and make a single right single left hand knot with string #4 (white). String #3 (lt. blue) will remain in slot 3.
-
Take string #9 (purple) and make a single left single right hand knot with string #8 (lt. blue). String #9 (purple) will remain in slot 9.
-
Take string #8 (lt. blue) and make a single left single right hand knot with string #7 (white). String #8 (lt. blue) will remain in slot 8.
-
Take string #2 (purple) and make a single right single left hand knot with string #3 (lt. blue). String #2 (purple) will remain in slot 2.
-
Take string #4 (white) and make a single right single left hand knot with string #5 (black). String #4 (white) will remain in slot 4.
-
Take string #7 (white) and make a single left single right hand knot with string #6 (black). String #7 (white) will remain in slot 7.
-
Take string #9 (purple) and make a single left single right hand knot with string #8 (lt. blue). String #9 (purple) will remain in slot 9.
-
Take string #3 (lt. blue) and make a single right single left hand knot with string #4 (white). String #3 (lt. blue) will remain in slot 3.
-
Take string #5 (black) and make a right hand double knot with string #6 (black). String #5 (black) will now be in slot 6.
-
Take string #8 (lt. blue) and make a single left single right hand knot with string #7 (white). String #8 (lt. blue) will remain in slot 8.
-
Take string #4 (white) and make a single right single left hand knot with string #5 (black). String #4 (white) will remain in slot 4.
-
Take string #7 (white) and make a single left single right hand knot with string #6 (black). String #7 (white) will remain in slot 7.
-
Take string #5 (black) and make a right hand double knot with string #6 (black). String #5 (black) will now be in slot 6.
-
At this point you have completed one rotation of the pattern. Repeat steps 5-33 to continue the pattern until your bracelet is long enough to fit your wrist.
-
Once your bracelet is long enough to fit your wrist, take the strings from slots 2-4 in your left hand, strings 7-9 in your right hand and braid with the remaining 2 center strings.
-
Take the braided strings and tie two basic knots at the end of your friendship bracelet. (Learn how to finish your friendship bracelet with knots or beads by visiting myfbm.com.)
- Unclip your friendship bracelet from the butterfly clip and cut off the excess braided section. Your bracelet is ready to wear or share!