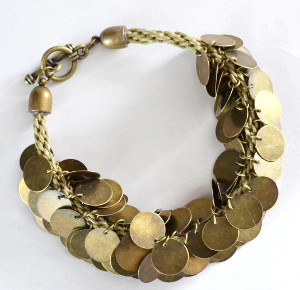
Boho Mixed Bead Kumihimo Bracelet

If you're bored with basic kumihimo patterns, try mixing it up with the Boho Mixed Bead Kumihimo Bracelet. Once you've learned how to kumihimo braid with beads, experimenting with different bead combinations seems like the natural next step. The assortment of wood, turquoise, and faceted gold beads in this kumihimo bracelet pattern creates an earthy palette any boho-chic fashionista would love to wear. See what different bead combos you can come up with as you try this DIY bracelet tutorial.
Project TypeMake a Project
Bead TypeWood, Miscellaneous
Time to CompleteIn an evening
Bead Project TypeBracelet

Materials:
- #34745016- 19.7yd 1mm Rayon Cord- Metallic Gold
- #34750021- 28pc Metal Findings Mix- Gold
- #34745010- 5x3mm 300pc Wood Rondelle- Brown
- #34745011- 5x3mm 300pc Acrylic Rondelle- Turquoise
- #34745003- 6mm 300pc Acrylic Faceted Rondelle- Gold
- #34745033- 5 3/8 1pc Round Disk
- #34745035- 1pc 2in Eye Needle
- #34745036- 8pc Bobbin Pack
- #22279001- 1oz E6000 Glue
- Shayna Bracelet Project Sheet
- #4457- Side Cutter Pliers
Instructions:
-
Cut four 49-inch lengths of gold metallic cord.
-
Bring the cord ends together and fold in half. Bring the fold down through the center of the round disc.
-
Cut a scrap piece of cord (4+ inches) and tie it onto the center fold from step 2.
-
Align the cords as explained in the “Beaded Kumihimo” instruction booklet that came with the round disc.
-
Using the big eye beading needle, thread four wood, three gold, one teal, three wood, three gold, one wood, three teal, three gold, one wood, two gold, four teal, three gold, and three wood beads onto each strand.
*This makes an 8-inch bracelet with cord ends and lobster claw clasp. Use fewer or more beads on each of the eight cords to decrease or increase the overall length.
-
Wind each of the eight cords (with beads) onto a bobbin and close.
-
Follow the beaded instructions that came with the disc. Braid the cord 1/2 inch before adding the beads.
*This section will be inserted into the clasp.
-
Braid a 1/4-inch tail after all of the beads have been braided in. Remove the cords from the bobbins and from the disc and tie them into a single knot. Remove the scrap cord from the other end.
-
Trim the excess cord. Insert an eye pin into each end section of the braid so the pins face out the ends of the braid. Then apply glue to the ends of the cords and slide the cord ends on, threading the eye pin shaft through the hole.
-
Form a loop. Use 4mm jump rings to attach a lobster claw clasp to one end and a length of extender chain to the other end.
*Allow the glue to dry according to manufacturer instructions (2+ hours).
Read NextBlue Iris Kumihimo Bracelet
Your Recently Viewed Projects
Thanks for your comment. Don't forget to share!
Editor LP
Jul 07, 2014
Hi there, We support JPEG, GIF and PNG images. Files must be no more than 1MB. Both the image height and the image width must be between 60 and 3500 pixels. We might suggest trying to resize your image prior to uploading to see if that helps. All images must be uploaded to Prime Publishing. This ensures your image is always available. Please try re-sizing your image before uploading. If you are still having issues, please let us know. We encourage you to contact us through our customer service using the "Contact us" link at the bottom of the page. Good luck uploading! We are excited to see your design. Best, Editors of AllFreeJewelryMaking
veilleja 0556759
Jul 07, 2014
My project photo will not upload to you. How else can I forward it. I took the photo with my sMsung galaxy camera, note says it's too big!
cher788
Mar 14, 2014
Any chance to get a bit more advice or photos on the process of getting the eye pin into the ends?
Report Inappropriate Comment
Are you sure you would like to report this comment? It will be flagged for our moderators to take action.
Thank you for taking the time to improve the content on our site.