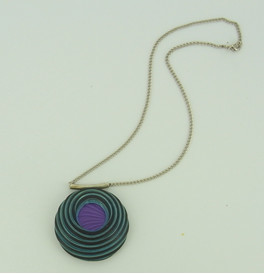
Peacock Spiral Pendant
Dazzle your friends with this gorgeous Peacock Spiral Pendant. Coils of clay combined with color shifting mica powder result in an electrifying domed pendant that is sure to impress. This DIY pendant is so striking, your friends will never believe that is it made from clay. Notice how the hypnotic peacock colored hues draw attention towards this stunning jewelry piece. If you are looking for a new way to create a stylish and unique DIY necklace, this pendant project is for you.

Materials:
Supplies Premo!: Black, Silver, Translucent
Clay Conditioning Machine
Sculpey® Super Slicer
Sculpey® Texture Plate Landscape Set – Dandelion pattern
Sculpey® Clay Extruder with 1/8” Circle Die
Sculpey® Hollow Bead Maker
Sculpey® Acrylic Roller
Needle Tool
Sculpey® Bake & Bond
Sculpey- Circle graduated cutter set - .75, 1, 1.75
Pearl Ex Powder in Duo Blue-Green and Reflex Violet
Curved tube bail with built-in loop
3/8” Circle Cutter
Small Paint Brush
Mister bottle filled with water
Sculpey Wet/Dry Sandpaper set - in 400, 600, and 1000 grit
Piece of denim
3x5 Index Cards
Instructions:
Getting Started
Do not use unbaked clay on unprotected furniture or finished surfaces. Start with clean hands and work surface area. Good work surfaces include wax paper, metal baking sheet, or disposable foil. Knead clay until soft and smooth. For best results, clean your hands in between colors. Shape clay, pressing pieces together firmly. Bake on oven-proof glass or metal surface at 275°F (130°C) for 30 minutes per ¼" (6 mm) thickness. For best baking results, use an oven thermometer. DO NOT USE MICROWAVE OVEN. DO NOT EXCEED THE ABOVE TEMPERATURE OR RECOMMENDED BAKING TIME. Wash hands after use. Baking should be completed by an adult.
Begin by preheating oven to 275°F (130 °C). Test temperature with oven thermometer for perfectly cured clay. For best results, condition all clay by running it through the clay dedicated pasta machine several passes on the widest setting. Fold the clay in half after each pass and insert the fold side into the rollers first.

1. Create a metallic Charcoal color by combining 4-parts Black with 1-part Silver. Condition the two colors together so that you have a uniform color. Load as much of this mixture as you can fit into the barrel of the extruder and insert the 1/8” round hole die into the end of the barrel. Set the remaining clay to the side. Extrude all of the clay in the barrel so you have a long strand of clay.

2. Roll a sheet of Silver on the #1 setting of the Clay Conditioning Machine and trim into a 3” square. Place the square of Silver onto the 3”x5” index card. Pick up one end of the extruded strand and use the Super Slicer blade to trim the end at an angle. Fold the tip of the angle cut end over onto itself so you can start rolling the extruded strand of clay into a flat spiral. One you have a spiral that is about ¾” in diameter gently press it down onto the center of the sheet of Silver. Continue to wrap the flat coil by using one hand to turn the index card like a turntable and the other hand to guide the strand of clay into position as you turn the card. Note: Using the index card as a turntable method help reduce the amount of handling of the clay and can also assist the creation of the coil. Stop every couple of loops around the coil and gently press the coil down so your coil is sticking to the Silver base sheet. Once you have a flat coil that is approximately 2-3/4” in diameter stop coiling and trim away the excess strand.

3. Pick up your ¾” circle cutter and cut a hole through the flat coil sheet where the center of the coil is. Next pick up your 1-3/4” circle cutter; position it so that the ¾” hole you just made is off center but still in from the edge of the 1-3/4” cutter by about 3/8” and cut out your circle. Pick up the paint brush and brush on a solid coating of the Blue-Green Duo Pearl Ex powder. Make sure you get complete coverage concentrating on the seam between the coils and be sure to brush around the inside of the ¾” hole.

4. Gently lift the powdered piece off of the index card and press onto the largest dome on the Hollow Bead Maker. Make sure the edges are pressed down all of the way around. You may notice that the coils separate from each other a little bit. You can gently press in from the outside edge to push them back together a little; just be sure you do this all of the way around with even pressure or your piece will distort from a circle shape. Go back over the piece with the brush and powder; because the coils may have separated a little you want to be sure you still have solid coverage in those seams. Bake the piece while on the Hollow Bead Maker for 15 minutes and let cool completely.

5. Condition some of the Translucent clay with the Reflex Violet Pearl Ex Powder. Add small amounts of the powder to the clay at a time. Adding too much powder at once can result in a mess. Continue adding small amounts of the powder and conditioning it into the Translucent clay until you have a nice solid color.

6. Roll this mixture into a sheet on the clay conditioning machine on a #2 setting. Lightly mist the surface of the sheet of clay with water and press the Dandelion Texture sheet into the clay, lift the texture sheet off of the sheet of clay, and gently pat the surface of the clay dry.

7. Use your Super Slicer blade to shave the raised areas of the texture off of the sheet. Once you have the surface of the sheet shaved down use the Acrylic Roller to smooth the surface of the sheet. Be sure to roll in all directions so you don’t distort the pattern. Select an area of interest on your sheet and cut out a 1” circle.

8. Pick up your baked coiled dome of clay. Start with the 400 grit sandpaper and sand the surface of the dome under running water. Do NOT sand in the seams; the goal is to remove the layer of powder from the top of the coils while leaving the powder in the seams. Once you have the powder off the top of the coils switch to the 600 grit, you won’t need to spend much time on the 600 grit; this is to smooth out the sanding marks from the 400. Once you have a consistent smoothness switch to the 1000 grit. After completing the sanding rinse the piece thoroughly and let dry. Turn the dome over and apply a very thin layer of Bake N’ Bond to the back just round the ¾” hole. Pick up the 1” circle you cut out in Step 4 and press it in from the back over the hole so the mica shift pattern can be seen through the hole from the top of the dome. Bake for 15 minutes and let cool completely.

9. Roll the remaining Charcoal mixture into a sheet on the thickest setting and place on top of an index card. Rub a thin layer of Bake n’ Bond around the bottom edge of your baked dome and press it firmly into the sheet of charcoal until the lip of the dome is even with the top of the sheet of clay. Pick up the needle tool and hold it so the end of the needle is pointing straight into the sheet of clay and against the outside edge of the dome. Push the tip of the needle tool all the way through the sheet of clay into the index card. Slowly drag the needle tool around the edge of the dome until you have gone all of the way around. Remove the excess sheet of clay, pick up the backed dome and smooth the clay round the edges. Bake for 15 minutes and let cool completely.

10. Roll some of the remaining charcoal mixture into a sheet on a thin setting. Cut two 3/8” circles. Take a moment to look at the pendant and determine which way you want the pendant to hang; for example with the purple backed hole at the top, the bottom, to the right, or maybe to the left. Once you know which way you want you pendant to hang add a thin layer of Bake n’ Bond to the back of the circle and place it on the back so the top edge of the circle meets up with the top edge of the back of the pendant. Pick up the tube bail and position it so that the ring can be pressed into the circle of clay with the tube of the bail resting on the top edge of the pendant. Once you have it lined up press the loop into the circle of clay. Add a thin layer of Bake n’ Bond over the top of the loop and add the second circle on top of the loop so the loop on the bail is sandwiched between the two layers of clay. Smooth down the edges of the circles so they blend into the back of the pendant. Bake again for 15 minutes and let cool completely.

11. After the piece has completely cooled buff the top of the pendant with the piece of denim. Buffing with the denim after sanding through 1000 grit sandpaper will create a nice satin sheen. When you turn and tilt the pendant you will see the color of the powder in the seams shift from Blue to Green; this is the result of using a “Duo” color of Pearl Ex powder. String your pendant onto a cord of your choice.
Read NextDalmatian Spots Horseshoe Necklace
Your Recently Viewed Projects
Thanks for your comment. Don't forget to share!
mulberrygalprinces s
Jan 22, 2018
OH my yes! I work with polymer clay and love it. Premo is my clay of choice. It comes in so many colors and it just makes up so nicely. This is a very easy project that looks complicated. Mica powder really makes the difference. You can use pastel chalk too.
Report Inappropriate Comment
Are you sure you would like to report this comment? It will be flagged for our moderators to take action.
Thank you for taking the time to improve the content on our site.