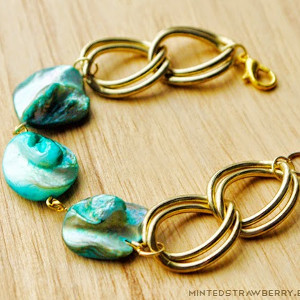
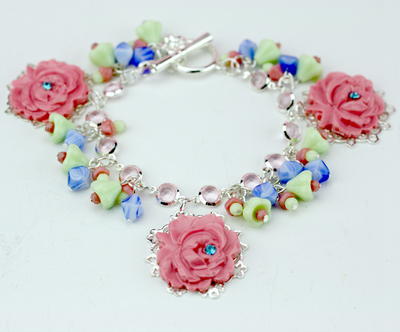
Really Rosy Charm Bracelet

Drape your wrist in vintage elegance. With its pretty clay charms and rhinestone accents, the Really Rosy Charm Bracelet is a glamorous take on a run-of-the-mill accessory. Learn how to make polymer clay beads in the shape of roses. The charms in this photo may look like they were made by a professional, but even amateur jewelry makers can achieve that textured look. Amp up this DIY charm bracelet by adding a rhinestone in a contrasting color, such as blue. It's perfect for spring, too!
From the blogger: "If you’re feeling a little romantic, this pretty charm bracelet is pure perfection. Pastel vintage inspired beads and charms dangle gracefully from a bright silver crystal chain. Wear this for tea for two or out to Sunday Brunch. No matter where you wear it, you’re sure to be charming."
Project TypeMake a Project
Bead TypeCrystal, Glass
Time to CompleteWeekend project
Bead Technique UsedChainmail/Wirework
Bead Project TypeBracelet

Materials List
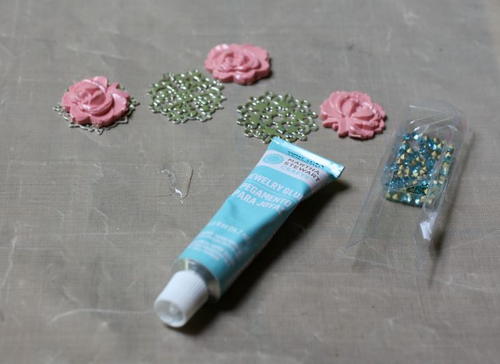
- 2-part Epoxy Clay Pink
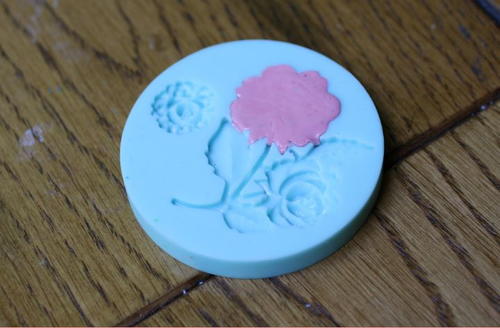
- Silicone Flower Mold
- Silver Plated Filigrees
- 3 2mm Ice Blue Crystal Chatons
- 10 4mm Czech Glass Flowers in Pink
- 10 6mm Czech Glass Flowers in Mint Green
- 10 of each 3mm Czech Glass Rounds in Pink and Mint Green
- 10 6mm Striated Blue Bicone Czech Glass Beads
- 12 link 4mm Pink Cuplink Crystal Chain (adjust to suit wrist size)
- 17 5mm Silverplated Jump Rings
- 2 pairs chain nose pliers
- Round nose pliers
- Wire cutters
Instructions
-
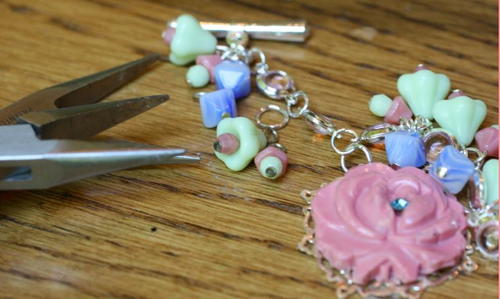
Press clay into mold to make three roses. Let dry.
-
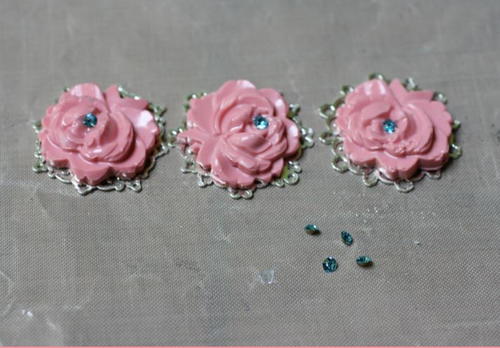
Use jeweler’s glue to adhere roses to filigrees.
-
Use jeweler’s glue to adhere crystals to centers of roses. Let cure.
-
Thread beads on head pins, the flowers each have a 3mm faceted round in opposite colors. These are threaded on the head pin first, followed by the flower. Bend wire flush to top of bead at a 90 degree angle. Use wire cutters to cut wire to ¼”. Grasp end of wire with tip of round nose pliers, turn into a loop. Secure loop with chain nose pliers.
-
Attach your beaded dangles and flowers using jump rings, each beaded dangle includes one of each loop topped component, for a total of three dangles per jump ring. The flowers are added individually. Add the dangles to every link between the chatons on the main chain. Components should be attached as follows: eaded dangle, beaded dangle, flower, beaded dangle, beaded dangle, beaded dangle, flower, beaded dangle, beaded dangle, beaded dangle, flower, beaded dangle, beaded dangle. Use chain nose pliers to open jump rings, slide beaded dangles on, thread into chain, secure closed using tension. Jump rings should be opened and closed properly so you don’t lose your dangles.
-
Attach toggle clasp to ends of chain. Use two jump rings on the toggle end and one on the circle end. This will allow the toggle to easily thread into the circle to secure the bracelet closed when worn.
Read NextVintage Pearl DIY Charm Bracelet
Your Recently Viewed Projects
Thanks for your comment. Don't forget to share!
Hippie Chick
Apr 26, 2017
Very beautiful, classy, and elegant bracelet. Looks way too difficult for me. I dont enjoy working with clay. I would rather buy my charms and findings pre made. I applaud the designer with her skill and expertise to be able to create such a beautiful piece of art. Great job.
Report Inappropriate Comment
Are you sure you would like to report this comment? It will be flagged for our moderators to take action.
Thank you for taking the time to improve the content on our site.