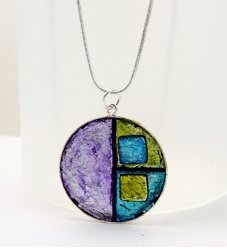
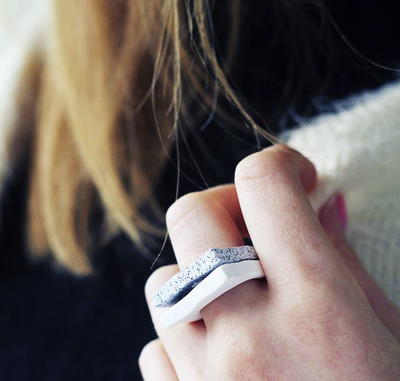
Sparkling Canal Pendant

The Sparkling Canal Pendant radiates sophisticated charm and beauty, and with this DIY pendant you'll be ready to make a splash. With this polymer clay tutorial, you'll have a stunning piece that's perfect for anyone who likes a little glamor in their craft. Wearing this fabulous pendant with a black dress and heels will make you the center of attention. No one will believe that this piece is handmade, but they'll all love the sleek and sophisticated design.
Project TypeMake a Project
Time to CompleteIn an evening
Bead Project TypeOther

Getting Started:
Do not use unbaked clay on unprotected furniture or finished surfaces. Start with clean hands and work surface area. Good work surfaces include wax paper, metal baking sheet, or disposable foil. Knead clay until soft and smooth. For best results, clean your hands in between colors. Shape clay, pressing pieces together firmly. Bake on oven-proof glass or metal surface at 275°F (130°C) for 30 minutes per ¼" (6 mm) thickness. For best baking results, use an oven thermometer. DO NOT USE MICROWAVE OVEN. DO NOT EXCEED THE ABOVE TEMPERATURE OR RECOMMENDED BAKING TIME. Wash hands after use. Baking should be completed by an adult.
Begin by preheating oven to 275°F (130 °C). Test temperature with oven thermometer for perfectly cured clay. For best results, condition all clay by running it through the clay dedicated pasta machine several passes on the widest setting. Fold the clay in half after each pass and insert the fold side into the rollers first.
Materials:
Clays:
- Premo! Accents: Peacock Pearl - 2 oz (1 block
- Premo! Accents: Bright Green Pearl - 2 oz (1 block)
- Premo! Sculpey®: Black - 2 oz (1 block)
- Premo! Accents: Silver - 2 oz (1 block)
- Premo! Accents: Pearl - 2 oz (1 block)
-
Premo! Accents: White Translucent - 2 oz (1 block)
Tools:
- Clay Conditioning Machine
- Clay Extruder
- Sculpey Acrylic Roller
- Sculpey® Clay Tool Starter Set
-
Sculpey® Super Slicer
Accessories:
-
Sculpey® Bake & Bond
Additional Supplies:
- PearEx poder - Interference Blue
- 4 mm Crystal Rhinestone Chain
- Football shaped cutter - 1 1/16" x 2"
Instructions:
1. Condition ¼ blocks each of colors Peacock Pearl and Bright Green Pearl. Cut 1/8 of a block of Pearl and Silver and condition together to create a Light Silver mix. Combine ¼ block of White Translucent with some of the Pearl-Ex to create an Iridescent Blue. Add the powder to the clay in small amounts to avoid creating a mess. Be careful not to add too much powder since it may cause the clay to crumble. Roll each color of clay through the Clay Conditioning Machine on a medium setting. Try to roll out the sheets so they are about the same size and shape.
2. Stack the iridescent blue on top of the Peacock Pearl and run through the Clay Conditioning Machine together on the medium setting. Stack the Light Silver on top of the Bright Green Pearl and roll this stack through together also on the medium setting. Stack the two pieces together so they alternate as Peacock Pearl, Iridescent Blue, Bright Green Pearl, and Light Silver. Adjust the Clay Conditioning Machine to the thickest setting and run all four colors through together once to compress the layers.
3. Cut the strip of clay in half length-wise and stack one half on top of the other so the pattern repeats in the same order. Use your acrylic roller to gently compress the two layers together. Cut this strip in half again and stack in the same manner, use the acrylic roller again to compress the layers. Repeat this process one last time so that you have a stack with 8 sets of the stripes.
4. Press the tip of the vegetable peeler straight down through the stack of clay all the way to your work surface. Do this repeatedly all over the stack being sure to press though close together with some overlapping.
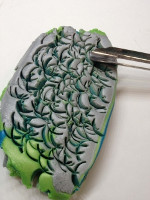
5. After you are done with the vegetable peeler press the stack back together from the sides so the holes you made are squeezed shut. Use your acrylic roller to roll the top smooth and flat. Place the stack of clay to the side to rest.
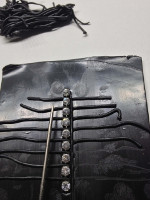
6. Condition the Black clay and roll it out on the thickest setting. Cut a length of the rhinestone chain that fits just a tiny bit short of the inside length of the cutter. Pull on both ends of the chain to remove any slack and lay it down on the sheet of clay in a straight line. Gently press the chain into the clay sheet just a little bit; be sure to apply even pressure and make sure the chain does not sink into the clay at an angle. Trim the black clay away from the chain leaving about 2” all the way around the sides and ends of the chain; you’ll need plenty of room for the cutter to be aligned over the chain.
7. Take a small amount of the Black clay you trimmed in Step 6 and put into the Clay Extruder. Insert the disc that looks like a screen with a bunch of 1mm holes. Extrude the Black clay so you have bunch of strands. Gently trim the extruded clay off the end of the Extruder. Pick up one strand of clay and lay it down across the chain in between two of the stones. Repeat this process until all of the flat lengths of chain between the stones are covered by a strand of clay. Pick up your Needle Tool and holding it almost parallel to the sheet of clay position the length of the needle right up against the side of the chain. Press down into the clay just a little bit and drag the Needle Tool towards you slowly. Repeat on the other side of the chain. This action not only trims away the excess length of the strands of clay it also blends the strands into the sheet underneath. Use your fingers to lift away the trimmed bits of clay strands.
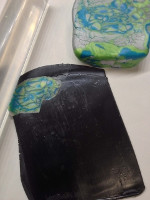
8. Roll the remainder of the Black clay you trimmed away in step 6 into a sheet on a medium/thin setting. Trim into a piece about the size of the sheet you have your piece of rhinestone chain pressed into. Bring your stack of colored clay back to your main work area and press it down to your work surface. This will keep it from moving around when you are taking slices off the stack. Pick up your Super Slicer flexible blade and curve it very slightly. Use the curved blade to take a small slice off the top of the stack. Lay the piece down on top of the sheet of Black clay and gently roll over it with your Acrylic Roller. Repeat this process making sure to roll over the slice each time you place one down to make sure you don’t have any air trapped. Once you have the entire sheet of Black covered in slices from your stack run it through the Clay Conditioning Machine once, this will help even out the surface. If the surface is still uneven reduce the thickness setting by 1 and roll through again.
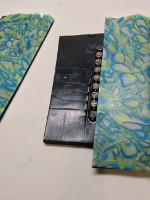
9. Cut the patterned sheet you just created in half and position the cut edge directly against the side of the chain. Repeat by placing the other half of the patterned sheet along the other side of the rhinestone chain. Once they are both in place use your fingers to gently smooth the clay down so the layers are stuck together.
10. Pick up the football shaped cutter and position it so the chain is running down the middle of the length of the cutter. Press the cutter so it goes all the way through and remove the excess clay. Use your fingers to gently smooth the cut edges and bake the piece for 30 minutes.
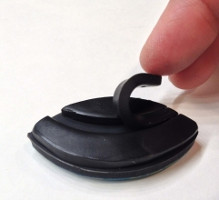
11. While the piece is baking roll a small sheet of black clay though on the thickest setting of the Clay Conditioning Machine and cut another football shape out. Trim the shape to be a little smaller by bending your Super Slicer Blade to match the curve. You only need to cut it about 1/16” smaller all the way around. Once the baked piece is cooled rub a very thin layer of Bake N’ Bond to the back of the baked piece and add the piece of trimmed football shaped piece of clay in the center. Using the football shaped cutter cut into the piece you just added to the back a little bit in from the edge and then again about 3/16” closer towards the middle from the first cut. Use your finger to gently lift the curved strip of clay out. This creates the channel for the cord. Bake the piece again for 10 minutes.
12. Once the piece is cooled roll a small sheet of clay on a medium/thin setting. Rub a small amount of Bake N’ Bond onto the back of the piece and add the small sheet. Use your Super Slicer blade to trim away the excess clay and bake the entire piece one last time for 10 minutes.
Optional: Glaze your baked piece with either Sculpey Glossy or Satin. String your pendant onto the cord and you’re done.
Read NextSquared Granite Stone Ring