Merry and Bright Clay Bead Bracelet

Once you're done adorning the Christmas tree, adorn your wrist with the Merry and Bright Clay Bead Bracelet. Make DIY jewelry that jingles all the way with this polymer clay tutorial. Learn how to make polymer clay beads that look like peppermints, presents, tiny trees, and more! This festive beaded bracelet would make a great gift for a jewelry-loving pal this holiday season. Festive in red, green, and silver colors this DIY bracelet is exquisite for the holiday season. Make this holiday bracelet for your friends today.
Project TypeMake a Project
Time to CompleteWeekend project
Bead Technique UsedStrung
Bead Project TypeBracelet

Getting Started:
Do not use unbaked clay on unprotected furniture or finished surfaces. Start with clean hands and work surface area. Good work surfaces include wax paper, metal baking sheet, or disposable foil. Knead clay until soft and smooth. For best results, clean your hands in between colors. Shape clay, pressing pieces together firmly. Bake on oven-proof glass or metal surface at 275°F (130°C) for 15 minutes per ¼" (6 mm) thickness. For best baking results, use an oven thermometer. DO NOT USE MICROWAVE OVEN. DO NOT EXCEED THE ABOVE TEMPERATURE OR RECOMMENDED BAKING TIME. Wash hands after use. Baking should be completed by an adult.
Begin by preheating oven to 275°F (130°C). Test temperature with oven thermometer for perfectly cured clay. For best results, condition all clay by running it through the clay dedicated pasta machine several passes on the widest setting. Fold the clay in half after each pass and insert the fold side into the rollers first.
Materials:
Clays:
- Premo! Accents: Pearl - 2 oz (1 block)
- Premo! Accents: Silver - 2 oz (1 block)
- Premo! Accents: White Translucent - 2 oz (1 block)
- Premo! Accents: Bright Green Pearl - 2 oz (1 block)
- Premo! Accents: Green Translucent - 2 oz (1 block)
- Premo! Accents: Frost White Glitter - 2 oz (1 block)
- Premo! Accents: Red Glitter - 2 oz (1 block)
- Premo! Accents: Gold - 2 oz (1 block)
- Premo! Sculpey®: Pomegranate - 2 oz (1 block)
- Premo! Sculpey®: Cadmium Red Hue - 2 oz (1 block)
- Premo! Sculpey®: Green - 2 oz (1 block)
Tools:
- Clay Conditioning Machine
- Sculpey Acrylic Roller
- Sculpey® Etch ‘N Pearl
- Sculpey® Super Slicer
Accessories:
- premo! Sculpey® Custom Bead Cores
- premo! Sculpey® Mini Metal Cutters-Basic Shapes
- Premo! Sculpey® Mini Metal Cutters-Holiday
Additional Supplies:
- Craft Knife
- Heat Set Crystals (3-5 mm)
- 5mm Jump Rings
- Pearl Ex Powder
- Fast Dry Clear Glue
- Bracelet Finding to string beads on
Instructions:
Creating Basic Beads:
- Cut off a ½"x½" square from the bar of base color clay. Condition. Divide conditioned clay into three equal pieces. Form pieces into balls for the base bead.
- Using the smallest size Etch 'N Pearl tool, pierce a hole through the bead with the narrow end of tool. Gently twist the tool through the bead while moving the bead up to the wide end of tool.
- Slide the bead cores, rounded sides out, onto both ends of the Etch 'N Pearl and insert into bead.
- Reshape and smooth the bead as necessary and remove from the Etch ‘N Pearl. If there is excess clay in the center, once bead cores are in place, use the small concave end of the Etch 'N Pearl tool to push it out.
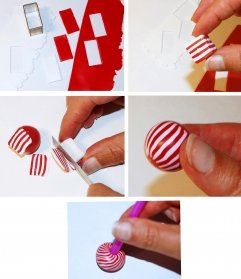
Creating the Candy Cane Stripe Bead:
 Create a basic bead in Red, as described in Creating Basic Beads, Step 1. Set aside.
- Using the Clay Conditioning Machine on the widest setting, roll out a sheet of White Glitter. Set this aside on your work surface. Next, roll out a sheet of Red Glitter on the wide setting.
- Using the Rectangle Cutter from the Mini Metal Cutter Set, cut out two rectangle shapes from the Red Glitter sheet and two rectangle shapes from the White Glitter sheet. Stack the rectangles, alternating the colors: Red, White, Red, White. Cut the stack in half and then restack again. Use the Acrylic Roller to slightly reduce the rectangle cane to make the stripes a little thinner.
- Using your Super Slicer, cut very thin slices of the cane.
- Apply the slices to your basic bead. Roll in your hands to smooth.
- If you desire the swirled pattern-Grasp the top and bottom of the bead and gently twist until the desired effect is achieved. Once you like the way the bead looks reshape the bead with your hands. (*Reserve some of the striped cane for the candy canes if you’d like to create a bead with a variety of techniques.)
- Complete the bead as described in Creating Basic Bead, Steps 2-4.
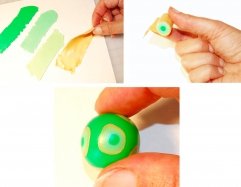
Creating the Translucent Bull’s Eye Cane Bead:
 Create a basic bead in Green, as described in Creating Basic Beads, Step 1. Set aside.
- Use 1/8 bar of Green and create a snake.
- Using the Clay Conditioning Machine on the widest setting, roll out 1/8 bar of Green Translucent into a sheet. Wrap the sheet around the green snake. Use the Super Slicer to remove any excess clay and smooth the seam with your fingers.
- Create a new color by mixing one part Green Translucent and two parts White Translucent (you do not need a lot of this mixture. Make enough to roll out a sheet that will cover the snake).
- Run this new color thorough the Clay Conditioning Machine on the widest setting. Wrap this sheet around the snake. Use the Super Slicer to remove any excess clay and smooth the seam with your fingers.
- Run a small amount of Gold through the Clay Conditioning Machine on a thin setting. Wrap this sheet around the snake. Use the Super Slicer to remove any excess clay and smooth the seam with your fingers.
- Reduce the cane until it’s the diameter you want. Use the Super Slicer to cut thin slices and apply the slices to your basic beads. Roll in your hands to smooth.
- Complete the bead as described in the Creating Basic Bead section, Steps 2-4.
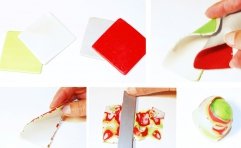
Creating the Mokume Gane Cane Bead:
 Create a basic bead in scrap clay, as described in Creating Basic Beads, Step 1. Set aside.
- Select 4 colors, you want to make sure that these will all look good together and offer a little contrast (pick two light and two darker).
- Using the Clay Conditioning Machine on the widest setting, roll out a sheet of each color. (Tip: To avoid color transfer, roll the colors out lightest to darkest.) Stack a sheet of the lighter color and a sheet of darker color. Run the two sheets together through the Clay Conditioning Machine. Do this for the remaining two sheets. Now stack the new sheets and run through the Clay Conditioning Machine again. Cut the stack in half and restack, run through the Clay Conditioning Machine again. Repeat once more.
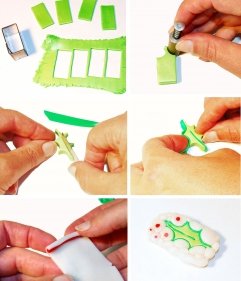
Creating the Holly Leaf Cane:
 Create a basic bead in White Translucent, as described in Creating Basic Beads, Step 1. Set aside.
- Using the Clay Conditioning Machine on the widest setting, roll out a sheet of Bright Green Pearl. Do the same for a small amount of Green clay.
- Place the sheet of your work surface. Using the Rectangle Cutter, cut out four rectangle shapes. Stack all four pieces.
- Using the edge of small round cutter, cut the edges of the rectangle stack to create the holly shape.
- Using the Super Slicer, create a slice up through the center, don’t cut all the way to the top.
- Using the Super Slicer, cut a strip wide enough to cover the center and the edge of the holly leaf. Place the strip in the center slice and gently press back together. Wrap the rest of the strip around the holly leaf.
- To create the berries- Run a small amount of White Translucent through the Clay Conditioning Machine on the widest setting, set aside. Roll out a thin log of Pomegranate. Place the Pomegranate log on the sheet of White Translucent, use the Super Slicer to make the sheet the same size as the log. Wrap the White Translucent sheet around the log several times to make it thick.
- Cut several pieces of this cane. Make sure to cut the cane the same height as the leaf height. Arrange the berries around the base of the leaf. Once you have all the berries you want. Fill the rest the area around the leaf with White Translucent balls.
- Carefully reduce the cane with your fingers, making sure not to distort the cane. Using the Super Slicer, make the slices as thin as possible. You can then apply these slices to the basic bead.
- Complete the bead as described in the Creating Basic Bead section, Steps 2-4.
Creating the Christmas Tree:
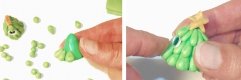 Create a Green cone shape as the base of the bead. Create several tiny Bright Green Pearl balls. You will want to shape these balls in to tear drops. You can vary the size of the drops for a more realistic look to your tree, starting larger at the bottom and getting smaller at the top. Layer the drops bottom to top until the tree is covered.
- Roll out a small, thin sheet of Gold. Use the Craft Knife to cut out a star shape to place at the top of the tree.
- Complete the bead as described in the Creating Basic Bead section, Steps 2-4.
Creating the Gift Bead:
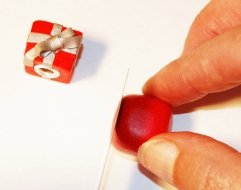 Cut off a ½"x½" square from the bar of Red clay. Condition. Divide conditioned clay into three equal pieces. Form pieces into squares. Using the Super Slicer, cut off the sides to make them perfectly squared.
- Decorate the gift with thin strips of Silver clay. You can even make a bow.
- Complete the bead as described in the Creating Basic Bead section, Steps 2-4.
Creating the Snowman Charm:
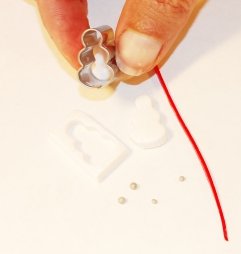 Using the Clay Conditioning Machine on the widest setting, roll out a sheet of White Glitter clay. Use the Snowman Mini Metal Cutter to cut out the snowman shape from the sheet of clay.
- Decorate your snowman as desired. Pierce the head of the snowman to fit the jump ring. Slice jump ring through the hole.
Making Metallic Beads:
 Create a basic bead in Pearl or Translucent, as described in Creating Basic Beads, Step 1. Set aside.
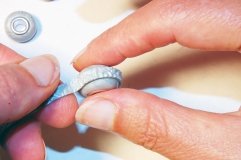
- Texture some of the Pearl or Silver clay with stamps or whatever you like and cut into thin strips. Wrap the silver beads with the texture. If desired, use metallic powder before baking to really make them shine.
- Complete the bead as described in the Creating Basic Bead section, Steps 2-4.
Adding Oven-safe Crystals:
 Create tiny balls of your desired color of clay. On your work surface push your flat backed crystals into the small balls of clay till the edges of the clay come up slightly over the crystal. Lift the crystal and clay carefully with your tissue blade and place on a bead. Press gently to adhere.
Baking Instructions:
Bake according to the manufacturer's instructions. While baking, avoid flat spots on your beads by placing them on a mound of polyester fiberfill or stringing them back onto your Etch 'N Pearl. You can prop the Etch 'N Pearl up by placing a ball of foil under each end. Bake as directed above.
For more homemade Christmas gifts, be sure to check out our holiday collection of 37 Last-Minute, Inexpensive Homemade Christmas Gifts!
Read NextCrystal Lantern Earrings
Your Recently Viewed Projects
Thanks for your comment. Don't forget to share!
StormRavn
Dec 10, 2012
Very pretty, this looks like a fun project to do with my granddaughter.
fabulousgrannies 6 823713
Dec 08, 2012
the clay designs are oftly cute, I will try this with some of my grandgals
Barnababy1
Dec 06, 2012
I've always wanted to try working with clay... this looks like a great place to start!
Penny Burkeen
Dec 06, 2012
I love working with clay, but I have never made my own beads. It sounds really fun!
Momof3a
Dec 06, 2012
I've made several pieces of jewelry but to make my own beads... This looks like fun!
blayne7 2622976
Dec 03, 2012
this looks like more than a nap time project for this mom, but it would be fun.
gnaholbert 1789471
Dec 03, 2012
Awesome one of my favorite mediums. I make a lot of jewelry componenets from polymer clay, this is right up my alley
hollowfyre 3193883
Dec 02, 2012
This looks like a lot of fun. I want to try to make something like it
Bllebby
Dec 02, 2012
This looks really cool! I'm sure it would take a lot of practice to get to this level of detail, but I'd love o try it one day
mothertruckerf9 22 27459
Dec 02, 2012
Love this. I make my own jewerly, love to make this one!
jneuman88
Dec 02, 2012
Love all the different styles ... I've always wanted to try working with clay and this makes me want to try asap!
reddragun382000 38 03080
Dec 02, 2012
Very nice. I have wanted a bracelet like this for a while and now I can make my own. Thanks.
bethwolfe
Dec 02, 2012
There are so many great ideas for beads here!!!! I love the bracelet and the colors!!
akaStacy
Dec 02, 2012
What a great bracelet for Christmas! It looks like so much fun to make. I have never worked with Polyform clay before. It looks like a lot of fun! I can't wait to try it! Good luck everyone!
kathleengs 5126634
Dec 02, 2012
Love the bracelet. I'm interested in learning how to do that! I have made my own jewelry with beads and metallic yarns ... but not clay.
vanbruggent 418762 4
Dec 02, 2012
I like to experiment with new crafts on wether or not they are easy, hold my attention long enough to complete, how expensive are the materials to continue making, if part or some can be bought. Lots of factors make up my mind on a new craft. So I have to say its a toss up on if I buy or make my jewelery.
esbtucker 9764493
Dec 02, 2012
That is one of the cutest clay bracelets I have ever seen! Love it
beelbac 2127822
Dec 02, 2012
Havent tried making any kind of jewelry,but thinking this would work for a first time piece.
marwats
Dec 02, 2012
I love this stuff and have tried it in the past but need to devote more time to it. Just got a few items and am waiting until xmas break to actually spend quality time using it. I would love to win the starter pack of stuff and of course the big haul!! I mean who wouldn't!! Merry Holidays everyone!!
alienpsychomom
Dec 02, 2012
I haven't tried any clay projects yet. I'm in the process of buying all of the supplies first. Can't wait to get started. This looks like the perfect first start. Thank you
Barbconley1
Dec 02, 2012
So very cute. Haven't tried jewelry making before but I just might have to now.
missy5260
Dec 02, 2012
Love this! have not tried making jewelry, this makes me want to try. Make lots of figures and pens.
TxMum2ThreeBoys
Dec 02, 2012
Excellent! Now I know what I am giving my niece for Christmas. She will love this!!
hisaphrodite223 59 84902
Dec 02, 2012
Super duper fantastic!!! I am going to make my own right now!! :D
wamorris 2383221
Dec 02, 2012
Love the bracelet and you can make earrings with the beads also!!!
rhonikta 0977695
Dec 02, 2012
Love this bracelet! I have never tried making clay beads but these instructions are easy to follow and looks like fun!
tomdsue
Dec 02, 2012
this is awesome. I make and buy my jewelry. hope I win . I will definitely use it
fuzzywuzzyismycat 7076901
Dec 02, 2012
This is adorable. And the instructions are very clear. Thanks.
kgorman41567 79968 22
Dec 02, 2012
Love these wonderful beads!!! I cannot wait to try these ideas......
iamdollie2
Dec 02, 2012
I've only been working with polymer clay for a couple of years but have found it relaxing and a great therapy for someone with muscle issues like me. Making different beads has been a challenge for me and I LOVE the ones in this bracelet! Thanks for the information - really valuable!
hagstrom 9386946
Dec 02, 2012
I love this! I finally bought some clay to make some jewelry - now I actually think I can do it with the great instructions!
Knittingdancer on Ravelry
Dec 02, 2012
Very cute and very detailed instructions on how to make the clay beads. I didn't realized the beads were handmade, I thought they were bought.
culleenman 8771345
Dec 02, 2012
very cute..I didn't realize that you had to make each piece for this bracelet. I thought they were premade. Very pretty
9llev18 1557731
Dec 02, 2012
so many cute beads ideas of where else to use them starting to roll-thank you
KristinDragos
Dec 02, 2012
I love how each bead is a little different but together they create a very festive look!
Ellen M
Dec 02, 2012
I definitely bookmarked this project - I have a daughter who loves to do polymer clay projects. Thanks for a very helpful tutorial!
debblr 3610159
Dec 02, 2012
beautiful project- such detailed instructions and so easy to follow- thank you!
gee vee
Dec 02, 2012
this bracelet is beautiful. it is very time consuming to make all the beads but it is so gratifying to know that you have. it would definitely be a "grab your wrist" item. people won't believe you did it yourself!!!
congrovel 4855272
Dec 02, 2012
I am always amazed at the creations made by crafters who use these types of clays. Such talented handwork.
Report Inappropriate Comment
Are you sure you would like to report this comment? It will be flagged for our moderators to take action.
Thank you for taking the time to improve the content on our site.