Bethany Necklace
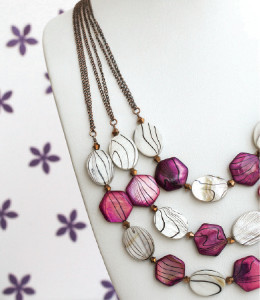
If you are looking to make a stunning shell and metallic beaded necklace, then this chic Bethany Necklace is just what you are looking for. Simple and elegant, this multi-strand DIY necklace is the perfect piece to wear to work, to lunch with friends, or to dinner with your special someone. With easy-to-follow instructions, this DIY jewelry tutorial will teach you how to make a necklace in just ten steps. Bring a little design and character to your appearance with this white, purple, and bronze Prima Bead necklace.
Project TypeMake a Project
Bead TypeMetal, Shell
Time to CompleteIn an evening
Bead Technique UsedChainmail/Wirework
Bead Project TypeNecklace

Materials:
- Needle Nose Pliers
- Crimping Pliers
- Wire Cutters
- 4mm Bronze Metallic Bicones (x1)
- Purple/White Shell Bead Strand (x3)
- Copper Small Chain (x2)
- Copper Findings Pack (x1)
- Gold 7-Strand Beading Wire (x1)
Techniques To Know:
- Opening Jump Rings
- Crimp Tubes
1. Cut the following lengths of beading wire: a 7”, a 9” and an 11” length.
2. Using crimp tubes, attach each wire to its own 4mm jump ring.
3. Thread the following pattern onto the 7” wire: a bicone, a white oval, a bicone, a purple hexagon, a bicone, a white oval, a bicone, a purple hexagon, a bicone, a white oval and a bicone.
4. Thread the following pattern onto the 9” wire: a bicone, a white oval, a bicone, a purple hexagon, a bicone, a white oval, a bicone, a purple hexagon, a bicone, a white oval, a bicone, a purple hexagon, a bicone, a white oval and a bicone.
5. Thread the following pattern onto the 11” wire: a bicone, a white oval, a bicone, a purple hexagon, a bicone, a white oval, a bicone, a purple hexagon, a bicone, a white oval, a bicone, a purple hexagon, a bicone, a white oval, a bicone, a purple hexagon, a bicone, a white oval and a bicone.
6. Using crimp tubes, attach each wire to its own 4mm jump ring. Trim the excess wire.
7. Cut (12) 8” lengths of chain.
8. Attach (2) chains to each 4mm jump ring.
9. Gather a set of chains from one end of each beaded section using a 6mm jump ring. Attach a toggle clasp to the jump ring.
10. Repeat the steps for the other set of chains and clasp.
If you like this project, be sure to download the free eBook, 13 Free Jewelry Patterns From Prima Bead, that it appears in!
Read NextAfrican Christmas Bead Necklace


