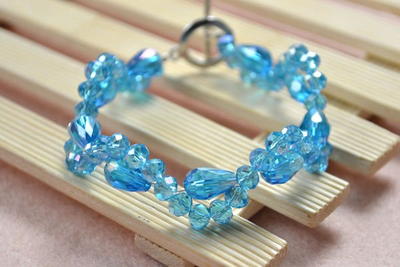
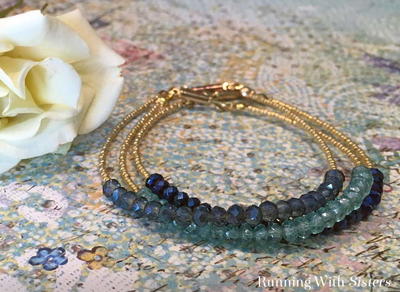
Shades of Blue Beaded Bracelet

Sit back and let the beads do all the work with this Shades of Blue Beaded Bracelet pattern. This bracelet makes a big impact but is very easy to put together. You'll be amazed that such simple bracelet making instructions can yield such great results. The spectrum of blue beads and the slanting crystal spacers really do all the work in this piece. All you have to do is string the beads together and you'll look like a jewelry making master. Beat those beading blues with this dazzling DIY bracelet.
Project TypeMake a Project
Bead TypeCrystal, Metal, Miscellaneous, Pearl
Bead Technique UsedStrung
Bead Project TypeBracelet

Materials List
- #34722034- 101pc 6mm Pearl/Crystal Mix Blue
- #34741058- 36pc 6mm Round Mirror Beads- Aqua/Dark Blue
- #34719057- 200pc 8mm Open/Close Jump Ring Silver
- #3202002- 40' .3mm 7-Strand Bead Wire- Silver
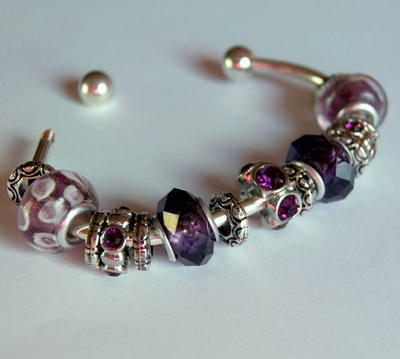
- (3) #34708262- 6pc 3-Strand Spacer- Silver & Crystal
- #34719059- 145pc Starter Pack- Silver
- Needle Nose Pliers # 4454
- Wire Cutters # 4457
- Crimping Pliers # 4501
Instructions
-
Cut three 10-inch lengths of beading wire.
-
Using a crimp tube, gather the three wires together and attach them to an 8mm jump ring. Connect a toggle clasp end to the same jump ring.
-
Thread each beading wire strand through the holes of a three-strand rondelle.
- Thread onto one of the end strands three blue bicones. Thread onto the middle strand two blue bicones. Thread onto the other end strand one blue bicone.
-
Thread a three-strand spacer onto the beading wire strands.
-
Thread a mirror bead onto the strand containing three bicones. Thread two mirror beads onto the strand containing two bicones. Thread three mirror beads onto the strand containing one bicone.
-
Thread a three-strand spacer onto the beading wire strands.
-
Thread three blue pearls onto the strand with the single mirror bead and three crystals. Thread two blue pearls onto the strand with the two mirror beads and two crystals. Thread one blue pearl onto the strand with the three mirror beads and one crystal.
-
Thread a three-strand spacer onto the beading wire strands.
-
Continue the pattern of beads until the bracelet is at the length needed.
-
Use a crimp tube to gather the three wires together and attach them to an 8mm jump ring. Connect the other toggle clasp end to the same jump ring.
Read NextSimply Glamorous Kumihimo Bracelet
Your Recently Viewed Projects
Thanks for your comment. Don't forget to share!
mulberrygalprinces s
Jul 07, 2017
If you can't find beads around town, go on eBay, search beads, United States only, unless you don't mind waiting a month for them. Then I click free shipping and dozens of sites come up. I always check the profile to see remarks. If their rating is lower than 99.4 I keep going. I have been using eBay for over 12 years and trust me, I learned. You will find these beads and it such a great and easy pattern, why not make it in various colors?
judithw100 0670812
Jan 29, 2015
If I were going to adapt this pattern to a necklace, I would make the beaded portion twice as long, and another 1/3 length of plain chain until you reach your desired chain length. That way the beaded portion will lie flat on your neck.
sugarbooger62 3343 231
Aug 07, 2014
Where can I buy the materials? I've searched your site, Lima Beads, etc. and I got no results matching anything close to what's required for this project. I'm looking for the 3-Strand Spacer beads and can't find them. Any help will be appreciated.
Editor LP
Aug 07, 2014
Hi there, This project is from Prima Bead. If you click on the green link below the title that says Prima Bead, it will take you to their company profile page. On that page there will be a link to the Prima Bead website. We think they will have the supplies you are looking for. If they do not, I might also suggest that you try posting your question to our sites Facebook page. It is monitored by the editor and is a great resource for helpful tips and suggestions from our Facebook friends; perhaps they can offer some guidance. Happy crafting, Editors of AllFreeJewelryMaking
bsjwilson 3666366
Aug 05, 2013
Hi everyone, I would imagine that to make this bracelet into a necklace all you would need to do is repeat the pattern until you have the length that you need to fit around the neck then finish it off the same as this pattern. This would make a beautiful choker type necklace.
i luv 2 cook
Aug 10, 2013
I tried that with a similar pattern and it just kept getting tighter and tighter and didn't want to lay right. It was making almost a coil affect. Any other ideas? I'm new to jewelry making and I'm not afraid to try things, but I have a beautiful pink necklace coil I don't know how to fix.
sugarbooger62 3343 231
Aug 07, 2014
To: i luv 2 cook you may be pulling your thread too tight.
i luv 2 cook
Jun 26, 2013
I'm disappointed that I have not seen an answer to my comment about adapting this pattern for a necklace yet. If it can't be done, then please tell me that, don't leave me hanging wondering. Thanks.
i luv 2 cook
May 11, 2013
I would like to know if this pattern could be adapted for a necklace and how would I do that. I love the pattern and really want a necklace to match. Thanks.
i luv 2 cook
Dec 13, 2013
I just wanted to update my comments about making this bracelet into a necklace. I ended up taking almost all the spacers out of the pink necklace I was working with. To make it the exact way the bracelet was made would not and did not work. I eliminated all but 6 spacer bars and the patterned changed completely. I would have loved the necklace to look like the bracelet, but I used the same beads and it looks good together as a set. But making it a choker would literally choke me, so it didn't happen.
Report Inappropriate Comment
Are you sure you would like to report this comment? It will be flagged for our moderators to take action.
Thank you for taking the time to improve the content on our site.