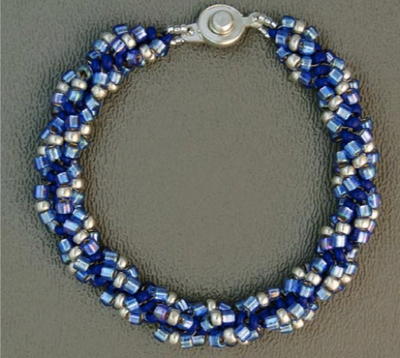
Autumn Sunset DIY Bracelet

String up this Autumn Sunset DIY Bracelet for a vibrant jewelry tutorial that reflects the beauty of the changing leaves. As the leaves fall this autumn, you can sport this gorgeous DIY jewelry piece that comes together more easily than it looks. Using uniquely shapes beads, you can learn how to make a bracelet that is perfect for cooler weather with this step-by-step jewelry making tutorial. This bracelet is a fall fantasy piece that you're going to love wearing!
Project TypeMake a Project
Bead TypeSeed
Time to CompleteIn an evening
Bead Technique UsedStrung
Bead Project TypeBracelet

Materials List
- 1 - Size 15 Metallic Brown Round Japanese Seed Beads (SB3489)
- 1 - Size 6 Matte Opaque Dark Metallic Brown Round Japanese Seed Beads (SB2977)
- 1 - 4mm Purple Iris Gold Tri-Bead Seed Beads (SB6519)
- 1 - 15x9mm Antique Copper Plated Brass Lobster Claw Clasp (BM0382)
- 2 - 2x2mm Antique Copper Plated Brass Crimp Beads (BM0291)
- 1 - 7mm Antique Copper Plated Pewter 16 Gauge Closed Jump Ring (PW1432)
- 10 inches - Clear Soft Flex Wire .014 diameter (SM0310)
- 1 - Smoke Gray FireLine Braided Bead Thread .008 diameter - 6 lb/Size D (SM1001)
- Wire cutters Crimping pliers (TL0500)
- Beading Scissors 1-1/4 in. Blade (TL0302)
- English Beading Needles, Size 12 (TL1647)
- Hypo Tube Cement
Instructions
-
Place one crimp bead and the loop on the lobster claw clasp onto a 10-inch length of beading wire. Pass the wire back through the crimp bead, and crimp the crimp bead. Trim excess wire with wire cutters.
-
String 7 inches (or the desired bracelet length) of size 6 seed beads (core beads). Allow about 3/8-inch of space on the beading wire. String one crimp bead and the closed jump ring onto the beading wire, pass the wire back through the crimp bead, crimp the crimp bead, and trim excess wire.
-
Thread a 6-foot length of beading thread onto a needle, and bring the needle to the middle of the thread. Tie a square knot at one end of the thread, pass through one core bead, and anchor the thread around the core bead. Place a dot of Hypo Tube Cement onto the knot, and allow the glue to dry.
-
String one Tri-Bead seed bead and one size 15 seed bead (fringe beads). Pass back down through the Tri-Bead, then through the next core bead. Pull the thread until the fringe beads sit just above the core beads.
-
In the same manner as Step 4, continue weaving in fringe beads until you have made at least three full passes through the bracelet. (If enough space remains between core beads, make a fourth pass. You may need to skip some core beads.) Tie off and trim the thread according to the technique.
Read NextMorse Code Beaded Wrap Bracelet
Your Recently Viewed Projects
Thanks for your comment. Don't forget to share!
mulberrygalprinces s
Sep 26, 2017
This is a very pretty and unique design. But after reAding thru the supply list, I think I will pass on this one. It's a little more than my wallet can handle right now. When a project costs more than going out and buying it I can't do it. But if I ever find myself with what I need, I will certainly give it a try.
Report Inappropriate Comment
Are you sure you would like to report this comment? It will be flagged for our moderators to take action.
Thank you for taking the time to improve the content on our site.