Electric Yellow Glass Pendant

Free jewelry making patterns for pendants are fun because you can make them into necklaces, earrings, and even bracelets. This Electric Yellow Glass Pendant is no exception. Slip this pretty pendant on your favorite chain or make two for earrings!
Project TypeMake a Project
Bead TypeGlass
Time to CompleteIn an evening
Bead Technique UsedGlass Beadmaking
Bead Project TypeNecklace, Other

This project is brought to you by Diamond Tech.
Materials:
- 1 pc Fuseworks™ Black (B) Sheet Glass
- 1 pc Fuseworks™ Yellow (Y) Sheet Glass
- 1 pc Fuseworks™ Clear Dichroic (D) Sheet Glass
- Fuseworks™ Kiln Paper
- Fuseworks™ Microwave Kiln
- Fuseworks™ Glass Cutter
- Fuseworks™ Large Pendant Bail
- E6000® or other glass glue
Instructions:
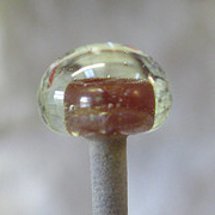
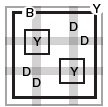
- Measure and mark the following glass sheets: Black sheet glass - 1 3/8” X 1 3/8” square, Yellow sheet glass - 1 ¼” X 1 ¼” square and Two ½” X ½” square, Clear dichroic – four 1 ¼” X ¼” (which will be arranged in a tic tac toe pattern)
- Using a glass cutter, cut glass to designated sizes as indicated above.
- Next, cut a 2” X 2” piece of kiln paper. Remove the lid from the Fuseworks™ Kiln. Place the kiln paper on the kiln base.
- Layer the glass on the kiln paper in the same pattern as the image below. Start with the base, 1 3/8” X 1 3/8” black square (B). Next place the 1 ¼” X 1 ¼” yellow square (Y) on top of the base glass. Next, create a tic tac toe design on top of the yellow glass by placing two clear dichroic (D) strip parallel to one another lengthwise, then top them by placing two more dichroic strips widthwise. Finish by placing two yellow (Y) squares in the upper left and lower right of the design.
- Carefully set the base with glass inside the microwave. Cover base and glass with kiln lid.
- Fuse in a microwave kiln at 60% for 3 minutes and 30 seconds, at 70% for 1 minute and 30 seconds, and at 100% for 30 seconds. PLEASE NOTE: All microwave and kiln combinations will have different firing patterns. Be sure to take careful notes and log all fusing times for future use.
- After the first time interval, open microwave and, using Hot Mitts, carefully lift the lid enough to inspect the fusing process. Add additional time in 30 second increments until desired results are achieved. Remove kiln from microwave using the Hot Mitts and place on a heat resistant surface. Cool the kiln on a fire safe surface for at least 30 minutes with the lid on. Removing the lid or peeking under the lid during the cooling will result in your piece cracking. Glass remains hot for a long time and should be handled with great caution.
- When cool, adhere a large gold bail to the back of the pendant using a glass adhesive such as E6000®. Allow to dry according to glue manufacturer direction. Slip pendant onto your favorite chain and enjoy.
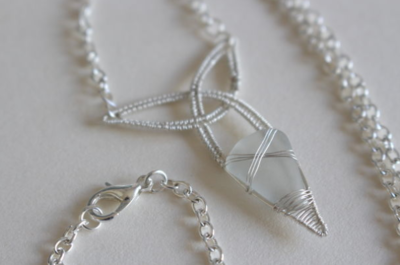
Read NextCeltic Knot Sea Glass Pendant
Your Recently Viewed Projects
Thanks for your comment. Don't forget to share!
mulberrygalprinces s
May 25, 2017
I would love to make this but the cost is prohibit ing. I don't have a microwave kiln which is very expensive to begin with. I usually come to this site to find great ideas that don't cost all that much. So this one will just have to be passed by. Thank you for your offering it though, it's a beautiful idea.
Report Inappropriate Comment
Are you sure you would like to report this comment? It will be flagged for our moderators to take action.
Thank you for taking the time to improve the content on our site.