This project was submitted by one of our readers, just like you.
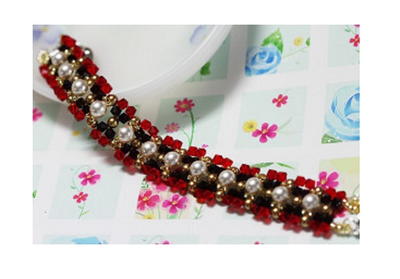
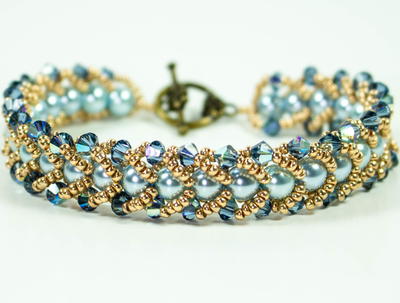
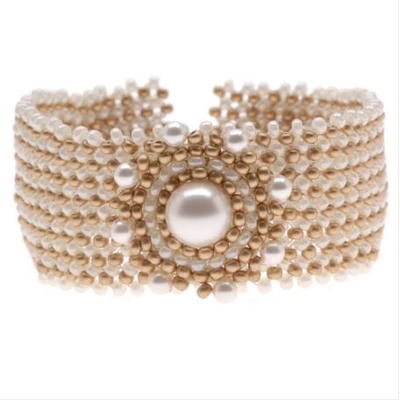
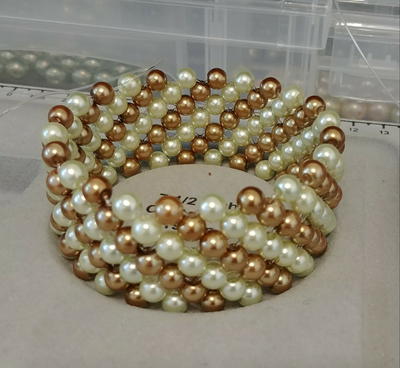
Lucky 7 Beaded Pearl Bracelet

Lucky 7 Beaded Pearl Bracelet
In just a couple of hours, you can create your very own Lucky 7 Beaded Pearl Bracelet! Pearls are a timeless symbol of class and elegance, and this dreamy pearl cuff bracelet is no exception. Using 0.7mm stretch cord, you can weave together glass pearls to make a glamorous bracelet. Not a big fan of pearls? No worries! This DIY beaded bracelet would also look lovely using any 6mm beads you choose. Whether you make this bracelet as a gift, or keep it for yourself, the wearer is sure to feel a little bit luckier with this beauty on their wrist.
Project TypeMake a Project
Bead TypePearl
Time to CompleteIn an evening
Bead Technique UsedStrung
Bead Project TypeBracelet

Materials List
- 6mm Beads (2 colors)
- 0.7mm Stretch Cord
- 2 Big Eyed Needles
- Needle Nose Pliers (Needle Nose Pliers are used to pull the cord through very tight holes in beads)
- Strong Craft Glue
- Scissors
Instructions
Start each bracelet with the number of beads needed for each bracelet.
For a 6-inch you will need: 126 beads (63 of one color and 63 of another color). Use 6 3/4 inches of cord.
For a 7-inch bracelet you will need: 140 beads (70 of one color and 70 of another color). Use 7 1/2 inches of cord.
For a 7 1/2 inch bracelet you will need: 154 beads (77 of one color and 77 of another color). Use 7 3/4 inches of cord.
For a 8-inch bracelet you will need: 168 beads (84 of one color and 84 of another color). Use 7 3/4 inches of cord.
6-inch (27 Beads); 7-inch – (30 Beads); 7 ½ inch – (33 Beads); 8-inch – (36 Beads); 8 ½ inch – (39 Beads)
-
Thread (1) big eyed needle on each side of the cord.
-
Start with the number of beads above for your bracelet.
-
String 2 beads of each color on each side of the cord, then center the 4 beads, this will make a diamond shape with the 4 beads.
-
Take the right cord and cross it through the last bead on the left side of the cord, pull the two cords mid-way than even the cords and the (1) bead, pull together to have all (4) beads go back to the diamond shape.
-
Next you will string one bead of the color that is on the bottom on the right side of the cord and one color of the bead that is sitting on the top on the left side of the cord.
-
The same color you placed on the left side of the cord you will now string that same color on the right side of the cord. (You will now have two beads on the right side of the cord).
-
Take your left cord and cross it through the last bead on the right side of the cord.
-
The bead that is sitting on the left and string (1) on each cord. Take your right cord and cross it through the left bead and pull together. Take your left cord and string it through the very next bead and pull.
-
Repeat step 8 until you have (1) bead to string on the cord.
-
String on (1) bead on the left cord and cross the right cord through the left bead and pull together.
-
The bead that was just strung on, take that same color bead and string (1) that bead on the right cord. Take the color that is sitting on your left and string it on the left and right cord. Take your right cord and cross it through the left bead and pull together. Take your left cord and string it through the very next bead and pull together.
-
The bead that is sitting on your left, string (1) on your left cord and one your right cord. Take the right cord and cross it through the left bead. Take the left cord and string it through the very next bead and pull together.
-
Repeat step 12 until you have (1) bead left to string on.
-
Take your left cord and string it through the bead below it on the left, take your last bead and string it on the left cord, take the right cord and cross it through the left bead and pull together.
-
Take your right cord and string it going up through (1) bead on the right side. Take the right cord and string it through the 4th bead in the right row.
-
Take your left cord and string it going up through (1) bead on the left side. Take the left cord and string it through the 4th bead in the right row. Take the left cord and string it through the 5th bead in the right row.
-
This is when you can now remove your needles from the cord.
-
Take the (2) cords and make your first knot between the (2) beads, insuring the 1st knot is tight, make a 2nd knot than add a dab of glue and make another knot so the last knot will sit on the glue and let dry for approximately 1-2 hours. After the glue dries cut the remaining cords and trim the cords as close to the knot as possible without cutting the knot. Pull the knot inside the bead. (if the knot will not go inside the bead, you can leave the knot between the (2) beads as it is or to your liking).

Read NextSea Goddess Bracelet
Your Recently Viewed Projects
Thanks for your comment. Don't forget to share!
mulberrygalprinces s
Apr 16, 2018
Another class act. I am not a pearl lover but even I would wear this one. It has such a royal look to it. Plus it's very easy to make. Read thru the directions and you will agree. And speaking of them, you don't have to go looking for them, they are right there.
Hippie Chick
Apr 12, 2018
Pearls are timeless beauties. They add a touch of elegance and femininity to any piece. They are also very versatile as they can be worn with any style of outfit from casual to formal. This beaded bracelet would make a great piece for my collection and I see that it can be made in one evening.
Report Inappropriate Comment
Are you sure you would like to report this comment? It will be flagged for our moderators to take action.
Thank you for taking the time to improve the content on our site.