This project was submitted by one of our readers, just like you.
Beaded Turquoise Statement Earrings
Learn how to make earrings at home that rival the baubles you see in boutiques.
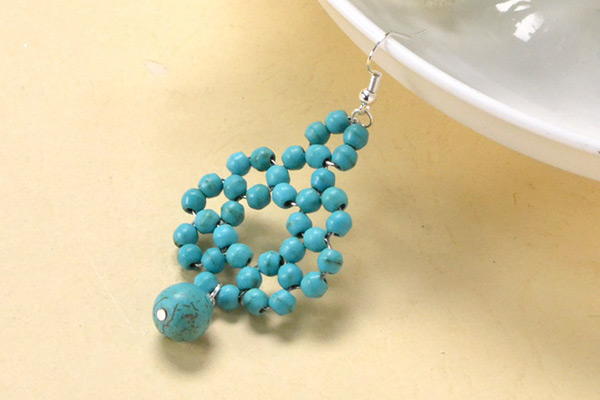
Turquoise jewelry will never go out of style, and these Beaded Turquoise Statement Earrings are the perfect easy jewelry project to embrace the trend. If you have ever seen a piece of turquoise jewelry in a pricey shop and wondered if you could make it yourself, this is the perfect tutorial for you. Making wire jewelry can be tricky, but this tutorial is very simple. Follow the step-by-step photos in this patterns to make your very own DIY bead earrings, minus the boutique price tag!
From the Blogger: "Want to learn how to make delicate beaded earring design with turquoise beads? This tutorial will show you how to make a pair of turquoise beaded dangle earrings, hope you’ll like the design. Turquoise beads are one of the most popular jewelry beads among jewelry craft materials. With some turquoise beads and jewelry wires, just add the earrings hooks, you can make very delicate accessories just like the beaded dangle earrings we’re going to make now. Please follow if you feel interested."
NotesWow! These turquoise beaded dangle earrings are so delicate! Don’t you want to have a try? No need any professional beading or wire wrapping skills, just follow this Beebeecraft tutorial, even you are a beginner, you can make a pair at home.
Project TypeMake a Project
Bead TypeGemstone, Miscellaneous
Time to CompleteIn an evening
Bead Technique UsedStitched
Bead Project TypeEarrings

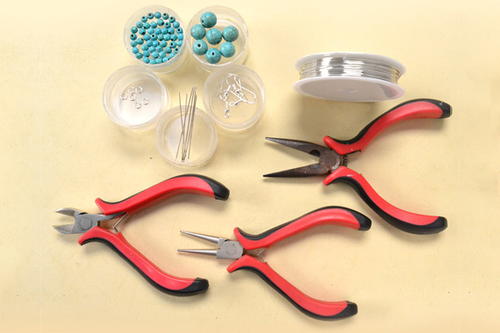
Materials List
- 4-5mm Round Turquoise Beads
- 10mm Round Turquoise Beads
- 0.8mm Silver Copper Jewelry Wire
- Mixed Size Iron Jump Rings
- Iron Earring Hooks
- Silver Color Pins
Instructions
-
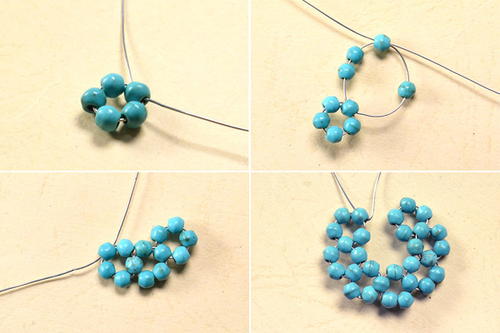
String five 4-5mm turquoise beads on the 0.8mm copper wire.
-
Slide 2 turquoise beads on the left wire and another 2 on the right. Thread the left copper wire through the first bead on the right and tighten the copper wire.
-
Continue to add the turquoise beads as in Step 2 and tighten the wire to make 6 more loops of turquoise beads (7 loops total).
-
String a 4-5mm turquoise bead on the right copper wire and cross the wire through the first turquoise bead in the first loop. Add 2 turquoise beads on the left wire and one on the right wire. Thread the wire as shown in the picture and tighten the loop of beads.
-
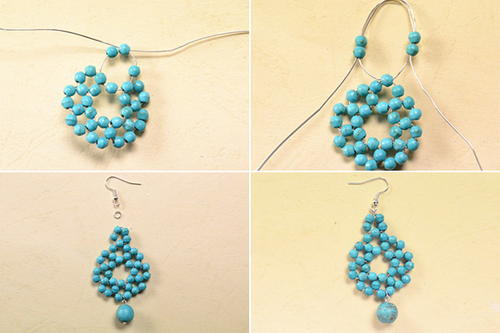
Add 2 turquoise beads onto each side of the wire. Thread the left wire down through the beads on the right wire, then thread the right wire down through the beads on the left wire. Cross the 2 ends of the wire through the center bead to form a loop. Tighten the wire and cut off excess wire.
-
Attach an earring hook onto the top loop with a jump ring.
-
String a 10mm turquoise bead onto a head pin. Form a loop, then attach to the bottom of the earring using a jump ring.
-
Repeat steps 1-7 to form a second earring.
Read NextDIY Swarovski Cube Earrings
Your Recently Viewed Projects
LizaMoline
Mar 28, 2021
I just made a pair using this pattern and various shades of purple Czech glass beads- and instead of the dangle at the bottom, I put it in the center. They came out beautiful!! I think next time I would use a good quality beading thread instead of the wire, though. as it has to get wrapped and passed through and pulled tight repeatedly. After all that, I actually had a wire break- thank goodness it was near the finish and I was able to wrap it off without too much trouble.
Nancy
Jan 29, 2019
I'd like to know how much wire you need to make one earring. It's not really stated in the instructions.
mulberrygalprinces s
Sep 13, 2018
This is one of the projects that can be fun and yet turn out something gorgeous for you or a friend. It's so easy that you can't mess up. It's inexpensive depending on what beads you use. They don't have to be turquoise. I like to use Czech glass beads. They are pretty and won't break the budget.
Report Inappropriate Comment
Are you sure you would like to report this comment? It will be flagged for our moderators to take action.
Thank you for taking the time to improve the content on our site.

