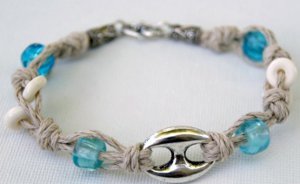
How to Make a Shamballa Bracelet

From Beyonce to Bieber, all the celebrities are wearing these shamballa bracelets. Learn How to Make a Shamballa Bracelet of your own by following along with this free jewelry-making video! Hey, we can't all afford to ice out our wrists like Jay Z, but we can all afford to make gorgeous DIY bracelets. Shamballa bracelets are popular because they symbolize peace, tranquility, and happiness. They can be worn for healing, meditation, or simply because they are stylish. Try out this calming, but fun bracelet pattern today.
Project TypeMake a Project
Bead TypeCrystal, Miscellaneous
Time to CompleteUnder an hour
Bead Project TypeBracelet

Materials List
- Cording (hemp, leather, etc.)
- 6-9 larger beads (depending on your bracelet size). Note: Bead size is really personal preference. Just make sure your cord goes through the bead hole.
- 2 smaller beads
- Clipboard
- Paper fastener
- Scissors
- Glue
Instructions
-
Cut one length of cord (center) approximately 16 inches, one cord (wrapping cord) approximately 50 inches, and one cord (closure) approximately 12 inches.
-
Leaving at least 6 inches at the top, fasten one end of the center cord to the clipboard and the other end with the fastener to secure.
-
Place the wrapping cord under the center cord and position in the center. Tie square knots for approximately ½ inch.
-
Place one of the smaller beads on the center cord. Slide it up to the square knots, and then tie three square knots after the bead to secure.
-
Place one of the larger beads on the center cord. Slide it up to the square knots, and then tie two square knots after the bead to secure.
-
Continue step 5 for all large beads, but on the last bead, tie three square knots.
-
Place the other smaller bead on the center cord. Slide it up to the square knots, and then secure in place with another square knot.
-
Continue with the square knots for approximately ½ inch (match the beginning square knot length).
-
Using the outside wrapping cords, tie an overhand knot tightly and then dab a tiny amount of glue on the knot to secure. When the glue is dry, trim cord.
Closure for Your DIY Shamballa Bracelet
-
Position the ends of the bracelet's cords (you should have some good length there) together, one facing one side, the other facing the other, but next to one another. Take the 12-inch closure cord and slide under these cords so that the closure cord is centered under them. Create about an inch of square knots with the closure cord enclosing the bracelet ends (one bracelet end coming out of the top of the square knots, and one bracelet end coming out of the bottom of the square knots).
-
Using the ends of the closure cord, tie an overhand knot and dab a tiny amount of glue on it.
SPECIAL NOTE: BE CAREFUL HERE – Do not glue the closure to the bracelet cords or they will not “slide” in the closure.
Finishing Your DIY Shamballa Bracelet
-
Slide a small bead on the ends of each of the bracelet ends, and tie a knot in the cords to keep the beads on. Remember not to tie these knots too close to closure. You want to be able to loosen the bracelet to get it on and off.
How to Tie a Square Knot (for bracelet)
-
Begin with center cord(s) straight up and down (fasten to secure).
-
Take second cord and place under the center cord horizontally and centered.
-
Position the left side over the center cords, leaving an open area.
-
Take the right side and place over the left cord, then under the center cord(s) and up through the loop that was formed in step 3.
-
Pull gently on the two ends and tighten. This forms the first half of the square knot.
-
Position the right side over the center cord(s), leaving an open area.
- Take the left side and place over the right cord, then under the center cord(s) and up through the loop that was formed in step 6.
-
Pull gently on the two ends and tighten. This forms your completed square knot.
DID YOU KNOW?
Shamballa bracelets are very popular and trendy, but they also have a significant meaning and history. Shamballa is actually a reference to a mythical kingdom believed in by Tibetan Buddhists. It is mentioned in several ancient texts. It is supposed to be a symbol of enlightenment, peace, and perfection. According to myths it is very difficult to find but is located somewhere deep in Asia. Currently, shamballa is most associated with meditation. Shamballa bracelets are worn for healing, mediation, finding a spiritual path, and sometimes just for fashion. They are meant to symbolize peace, tranquility, and happiness.
These bracelets in commercial form started in 1994 in France, specifically Paris and increasingly spread because of trendy individualistic meanings and its holistic style. Each shamballa bracelet is as unique as the person who wears it. Every color, design, and even the style of the bracelet have individual meanings. For example, black shamballa bracelets denote strength and authority; it is considered to be a very formal, elegant, and a prestigious color. Black shamballa bracelets are the top selling shamballa trend. In general, though, these bracelets are made from a cord that is tied in special knots, a form of macrame. Shamballa bracelets are woven, braided, and knotted and incorporate various beads, stones, gems, and metal. Now you can learn how to make a shamballa bracelet at home and your bracelet can have its own unique meaning to you.
Read NextWavy Friendship Bracelet
Your Recently Viewed Projects
Thanks for your comment. Don't forget to share!
mulberrygalprinces s
Mar 12, 2018
I saw this a while back and saved it but then firgot about it. I was going through my saved projects and came across it so decided to make it. It was super easy and made up in no time at all. I used left over beads so the cost was minimal.
Laura P
Feb 09, 2016
Such a great beginner project! Love this black cord and metallic bead combo!
horses 41
Aug 19, 2013
Beautiful, cute bracelet fashionable and good for showing off at the beach
Reetzeez Piecez
Apr 17, 2013
FINALLY, someone has used the simple instructions. I was taught macram by a girl in my high school social studies class, She said all you have to remember is over, over, under, through and under, under, over, through. Every video goes into a long drawn out method of make a "c" then pass your thread over... It's a whole lot of work for a simple process. Thank you for making it simple for everyone.
marydrake2010 9605 875
Oct 16, 2012
I HAVE REALLY ENJOYED ALL YOUR VIDEOS BUT I REALLY WANTED TO MAKE THIS BRACELET AND YOU WERE SO HELPFUL.
Penny Kitzmiller
Aug 09, 2012
Great job...thank you for the video that was good!! pennykitzmiller@charter.net
gomco 3191987
Aug 09, 2012
Create this bracelet = one evening. Create the crochet tote = Unknown. A no-brainer...instant gratification!
love2craftbyChuy
Aug 09, 2012
as a jewelry maker I have to chose this as my favorite - I love making these type of braceletes
Report Inappropriate Comment
Are you sure you would like to report this comment? It will be flagged for our moderators to take action.
Thank you for taking the time to improve the content on our site.