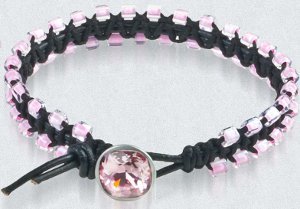
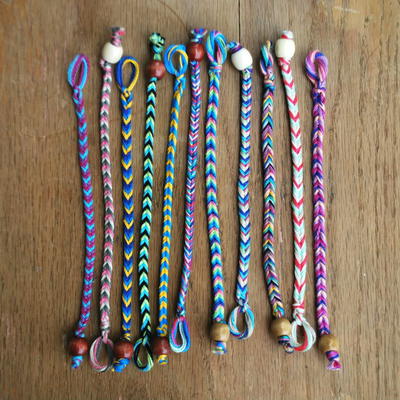
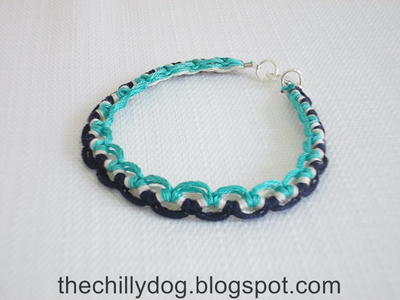
Zig Zag Friendship Bracelet Pattern

Looking for free macrame patterns online to try with your BFF? This Zig Zag Friendship Bracelet is a fun and funky design that will take your macrame skills to the next level! You could also use this pattern to make an anklet or necklace. If you haven’t made a macramé bracelet since you were little, no worries. This bracelet is easy to make but will still look fabulous on your wrist. This project was made using red, white and blue strands, but you can use whatever shades you want.
Project TypeMake a Project
Time to CompleteIn an evening
Bead Technique UsedStrung
Bead Project TypeBracelet

Instructions
-
Pick three different colors. You will use a total of five strands. (The example uses two strands of dark blue, two strands of white, and one strand of red).*For larger wrists or making ankle bracelets, we strongly recommend using full length strands. In this case, you would use four strands of dark blue, four strands of white, and two strands of red. Click here for instructions on how to tie your strings together to make your bracelet longer, or make a necklace.
-
Align string, fold in half, and tie knot 1/2 inch from fold, forming a loop.
-
Attach your 1/2-inch loop to MYFBM under the butterfly clip.
-
Separate strings by placing one string per slot. Note: Use the same color in slots 1, 2, 9, and 10 (dark blue), slots 3, 4, 7, and 8 (white), and slots 5 and 6 (red). This will align the colors of your bracelet pattern.
-
To begin, take string #9 (blue) and make a right hand double knot with string #10 (blue). String #9 (blue) will now be in slot 10.
-
Take string #7 (white) and make three right hand double knots, one each on string #8 (white), string #9 (blue), and string #10 (blue). String #7 (white) will now be in slot 10.
-
Use string #5 (red) and make five right hand double knots, one each on string #6 (red), string #7 (white), string #8 (blue), string #9 (blue), and string #10 (white). String #5 (red) will now be in slot 10.
-
Take string #3 (white) and make seven right hand double knots, one each on string #4 (white), string #5 (red), string #6 (white), string #7 (blue), string #8 (blue), string #9 (white), and string #10 (red). String #3 (white) will now be in slot 10.
-
Use string #1 (blue) and make nine right hand double knots, one each on string #2 (blue), string #3 (white), string #4 (red), string #5 (white), string #6 (blue), string #7 (blue), string #8 (white), string #9 (red), and string #10 (white). String #1 (blue) will now be in slot 10.
-
With your new string #1 (blue), again make nine right hand double knots, one each on string #2 (white), string #3 (red), string #4 (white), string #5 (blue), string #6 (blue), string #7 (white), string #8 (red), string #9 (white), and string #10 (blue). String #1 (blue) will now be in slot 10.
-
Take string #1 (white) and make seven right hand double knots, one each on string #2 (red), string #3 (white), string #4 (blue), string #5 (blue), string #6 (white), string #7 (red), and string #8 (white). String #1 (white) will now be in slot 8.
-
Again use string #1 (now red) and make five right hand double knots, one each on string #2 (white), string #3 (blue), string #4 (blue), string #5 (white), and string #6 (red). String #1 (red) will now be in slot 6.
-
Take string #1 (white) and make three right hand double knots, one each on string #2 (blue), string #3 (blue), and string #4 (white). String #1 (white) will now be in slot 4.
-
Use string #1 (blue) and make a right hand double knot with string #2 (blue). String #1 (blue) will now be in slot 2. Now we will start working our way back using left hand double knots.
- Take string #3 (white) and make two left hand double knots, one each on string #2 (blue) string #1 (blue). String #3 (white) will now be in slot 1.
-
Take string #5 (red) and make four left hand double knots, one each on string #4 (white), string #3 (blue), string #2 (blue), and string #1 (white). String #5 (red) will now be in slot 1.
-
Use string #7 (white) and make six left hand double knots, one each on string #6 (red), string #5 (white), string #4 (blue), string #3 (blue), string #2 (white), and string #1 (red). String #7 (white) will now be in slot 1.
-
Take string #9 (blue) and make eight left hand double knots, one each on string #8 (white), string #7 (red), string #6 (white), string #5 (blue), string #4 (blue), string #3 (white), string #2 (red), and string #1 (white). String #9 (blue) will now be in slot 1.
-
Use string #10 (blue) now and make eight left hand double knots, one each on string #9 (white), string #8 (red), string #7 (white), string #6 (blue), string #5 (blue), string #4 (white), string #3 (red), and string #2 (white). String #10 (blue) will now be in slot 2.
-
Take string #10 (white) and make six left hand double knots, one each on string #9 (red), string #8 (white), string #7 (blue), string #6 (blue), string #5 (white), and string #4 (red). String #10 (white) will now be in slot 4.
-
Now take string #10 (red) and make four left hand double knots, one each on string #9 (white), string #8, (blue) string #7 (blue), and string #6 (white). String #10 (red) will now be in slot 6.
-
Use string #10 (white) and make two left hand double knots, one each on string #9 (blue) and string #8 (blue). String #10 (white) will now be in slot 8. At this point, your pattern will start over.
-
Repeat steps 5-22 to continue your zig zag pattern. Keep repeating the pattern until the bracelet is long enough to fit your wrist.
-
Once your bracelet is long enough to fit your wrist, take the three strings from slots 1-3 in your left hand and the three strings from slots 8-10 in your right hand and braid with the remaining four center strings.
-
Take the braided strings and tie two basic knots at the end of your friendship bracelet. Learn how to finish your friendship bracelet with knots or beads by visiting myfbm.com.
-
Unclip your friendship bracelet from the butterfly clip and cut off the excess braided section. Your bracelet is ready to wear or share!
Tips:
Before you begin making your friendship bracelet, you should know how to make a Right Hand Double Knot and Left Hand Double Knot. You can see these instructions at myfbm.com.
These instructions teach you how to complete the pattern using My Friendship Bracelet Maker. However, the pattern can be completed without the loom as well.
Your Recently Viewed Projects
Thanks for your comment. Don't forget to share!
ladonasmile 955836 5
Dec 06, 2014
i dont know about you guys but jewellery is a very visual thing, so where are the images to illustrate your instructions. please use illustrations.however i do love your work, i have 3 kids to juggle, i have no time for all that reading, i work with pictures
Report Inappropriate Comment
Are you sure you would like to report this comment? It will be flagged for our moderators to take action.
Thank you for taking the time to improve the content on our site.