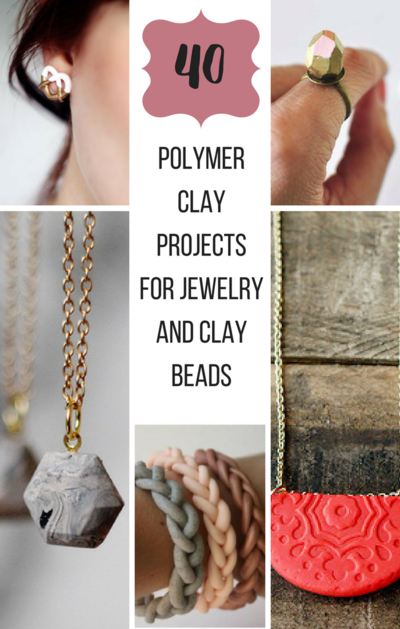
Romantic Rose Bangle

Put some love into your outfit with the Romantic Rose Bangle! This DIY bracelet design proves that polymer clay jewelry isn't just for kids. Learn how to make a bracelet that will take the breath away, and have some fun with the numerous color possibilities of clay. When you make this bracelet, you'll have a striking statement piece that captures the eye and the imagination. The design, simple embellishments, and colors give this jewelry piece the look of a beloved heirloom.
Project TypeMake a Project
Time to CompleteIn an evening
Bead Project TypeBracelet

Getting Started:
Do not use unbaked clay on unprotected furniture or finished surfaces. Start with clean hands and work surface area. Good work surfaces include wax paper, metal baking sheet, or disposable foil. Knead clay until soft and smooth. For best results, clean your hands in between colors. Shape clay, pressing pieces together firmly. Bake on oven-proof glass or metal surface at 275 °F (130 °C) for 30 minutes per 1/4" (6 mm) thickness. For best baking results, use an oven thermometer. DO NOT USE MICROWAVE OVEN. DO NOT EXCEED THE ABOVE TEMPERATURE OR RECOMMENDED BAKING TIME. Wash hands after use. Baking should be completed by an adult.
Begin by preheating oven to 275 °F (130 °C). Test temperature with oven thermometer for perfectly cured clay. For best results, condition all clay by running it through the Clay Conditioning Machine. several passes on the widest setting. Fold the clay in half after each pass and insert the fold side into the rollers first.
Materials:
Clays:
- Premo! Accents: Pearl - 2 oz (1 block)
- Premo! Accents: 18K Gold - 2 oz (1 block)
- Premo! Accents: Silver - 2 oz (1 block)
- Premo! Sculpey®: Pomegranate - 2 oz (1 block)
- Premo! Sculpey®: Alizarin Crimson Hue - 2 oz (1 block)
Tools:
- Clay Conditioning Machine
- Sculpey Acrylic Roller
- Sculpey® Super Slicer
Accessories:
- Sculpey® Bake & Bond
Additional Supplies:
- 3/8” Circle Cutter
- ¼” Circle Cutter
- Hot Fix Crystals in Light Colorado Topaz or a Golden/Peach Color
- Fine Point Tweezers
- Glass Jar or Bottle Approximately 2¾” in Diameter Note: You may want a bigger or smaller diameter item based on your hand/wrist size
- Yard Stick – Optional
- Masking Tape
-
600 and 1000 grit wet/dry sandpaper
Instructions:
1. To mix the rose gold color you need 1 full block of the 18K Gold, ¾ of a block of Pearl, a 3/8” ball of Pomegranate, and a 3/8” ball of Alizarin Crimson. Condition all 4 colors together thoroughly. You will know they are fully conditioned when you don’t have any swirling of colors. The end result will be an almost salmon pink metallic color.
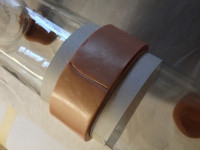
2. Set your Clay Conditioning Machine to the thickest setting and roll out a strip of the rose gold colored clay that is about 2” wide and long enough to wrap around the bottle or jar with some overlap. Take a few moments to look over the surface of the rolled strip of clay making sure there are no air bubbles, streaks, or other marks. Adjust your Clay Conditioning Machine to a medium/thin setting and roll out another strip of the rose gold colored clay. Stack one strip of clay on top of the other and gently roll over the two layers with the Acrylic Roller to press them together.
3. Using the Super Slicer, cut a strip of the clay that is approximately 1-3/16” wide; a standard yardstick is about this width. If you use a yardstick as your guide you can run the Super Slicer blade down each side to get a nice even edge on both sides. Don’t worry about trimming the ends of the strip square; this will be taken care of in Step 6.
4. Cut a long strip of paper that is at least 2” wide. It is helpful to trace a straight line on the paper from one end to the other. If you are using the yard stick as your guide for cutting, you can lay it on your paper and trace along both edges. This line will be helpful in Step 6. Wrap the paper around the glass bottle or jar so it fits very snugly. Make sure the line you drew on the paper matches up on both ends when you overlap the paper. Tape the ends together with the masking tape.
5. If you need to lay your bottle or jar on its side when you bake, you can use some scrap clay to make a stand for the bottle or jar to rest on. Roll two 2” balls of conditioned scrap clay. Space the balls on a baking sheet to accommodate the length of the bottle or jar. Press the bottle or jar down onto the balls of clay, making sure to leave a good inch of space between the baking sheet and the bottle or jar. Doing this will help keep the bottle or jar supported and allow you to bake the bracelet on the glass without it touching the baking pan. Bake the bottle or jar while still pressed into the clay balls for 30 minutes and let cool. Although this is not enough time to cure this volume of clay, the baking that will take place in the following steps will finish curing the stands.
6. Wrap your strip of clay around the paper. Use the line you traced on the paper as a guide to help you wrap the clay strip around the glass correctly. Overlap the ends of the clay and cut straight through both layers. Remove the excess clay. Gently press the ends together; you want to make sure they make good contact, but don’t use so much pressure that you dent the surface of your clay. Take a moment to look over the surface of the clay and gently smooth out any finger prints on the clay before you bake. Lay the bottle of jar back across the supports; bake for 30 minutes and let cool.
7. Once your piece has cooled, gently slide it off the bottle or jar. Use your fingers to spread a thin layer of Bake N’ Bond along the seam; use just enough to make the surface a bit sticky. Place some small pieces of the rose gold mixture over the seam and blend with your fingers to fill in the joint and smooth it over. Check the inside of the bracelet and edges and do the same. Doing this will not only help create a nice smooth and seamless base but also help eliminate any weak point. If it’s not perfect, don’t be overly concerned. The embellishments will be placed over the seam so it will be hidden. Once you have filled in and smoothed over the joint, you can lay the flat edge of the bracelet directly onto the baking pan. Bake for 10 minutes and let cool.
8. Note: This step is optional. Your bracelet will have very defined edges that you may find uncomfortable when wearing the finished piece. You can use the 600-grit sandpaper to round out the edges. Under running water, hold the sandpaper at a slight angle against the corner that makes up the side wall leading into the outside face of the bracelet. Use small circular motions and sand all the way around the edge. Repeat on both sides on both the top and inside edges. This will round off those edges and make the bracelet more comfortable to wear. If you wish, you can follow the 600 grit with 1000 grit. This will leave a nice satin feel.
9. Condition your 18K Gold clay and roll into a sheet on a medium setting. Use your 3/8” circle cutter and cut out 12 circles. Starting over the seam, dab a tiny bit of the Bake N’ Bond onto the bracelet and with the tip of your finger spread it into a narrow line across the width of the bracelet. Position three of the 18K Gold circles along this line.
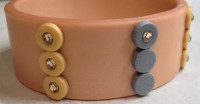
10. Add the remaining circles of clay in rows of 3, spacing them equally around the bracelet. The result should be that the outside of the bracelet is divided into quarters. Repeat step 10 and add a crystal to the center of each circle. Bake for 20 minutes and let cool.
11. Repeat steps 9 and 10 with the Silver clay. The rows of Silver should be spaced evenly between the rows of 18k Gold, which will divide the bracelet into 8 sections.
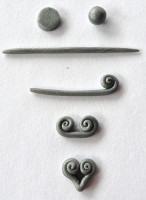
12. Use your ¼” circle cutter to cut 8 circles each of the Silver and 18k Gold clay. Take each cut circle and roll into a ball. Roll the ball into a snake of clay that is approximately 1¾” long and tapered on both ends. Start with one end of the snake and roll the clay into a flat spiral to just short of half the length. Move to the other end of the snake and roll into a flat spiral coming toward the first spiral so they mirror each other. Gently pinch the straight edge of the clay in the middle so you have a heart shape where the two spirals make the lobes of the heart. Continue this process with the rest of the cut circles of clay until you have eight “hearts” of each color formed.
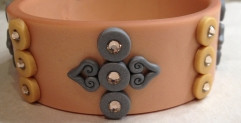
13. Add a tiny drop of Bake N’ Bond on each side of the center circle in each row you added in Step 9. Gently spread into a very thin layer in a small area right next to the circles. Pick up one of the hearts made in Step 11 and position on the side of one of the circles of the same color. The lobes of the heart should be against the circle with the point of the heart running along the length of the bracelet. Pick up another heart of the same color and position in the same fashion on the other side of the circle. Repeat this process all the way around the bracelet. Bake for 20 minutes and let cool. Your bracelet is now complete.
Read NextRustic Sea Foam Faceted Bracelet
Your Recently Viewed Projects
Thanks for your comment. Don't forget to share!
mulberrygalprinces s
May 01, 2017
Wow, once again I have learned a new technique. I have made bangles and cuffs but I never saw little hearts made like these.mthey are easy but so fancy looking. I am going to use them on other things I am making. Thank you so much for sharing a great tutorial and inspiring me once again.
Report Inappropriate Comment
Are you sure you would like to report this comment? It will be flagged for our moderators to take action.
Thank you for taking the time to improve the content on our site.