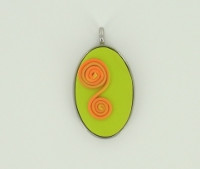
Faux Embroidery Pendant

Use the Faux Embroidery Pendant to inject a little whimsical charm into your outfit! The brightly colored DIY pendant will put a huge smile on everyone's face. And with the help of this polymer clay tutorial, you'll be able to get the delicate look of embroidery with all the fun of clay. Play with the colors and background of this cute pendant to have some fun neon pop, or use variations of color for a sophisticated ombre effect.
Project TypeMake a Project
Time to CompleteIn an evening
Bead Project TypeOther

Getting Started:
Do not use unbaked clay on unprotected furniture or finished surfaces. Start with clean hands and work surface area. Good work surfaces include wax paper, metal baking sheet, or disposable foil. Knead clay until soft and smooth. For best results, clean your hands in between colors. Shape clay, pressing pieces together firmly. Bake on oven-proof glass or metal surface at 275°F (130°C) for 30 minutes per ¼" (6 mm) thickness. For best baking results, use an oven thermometer. DO NOT USE MICROWAVE OVEN. DO NOT EXCEED THE ABOVE TEMPERATURE OR RECOMMENDED BAKING TIME. Wash hands after use. Baking should be completed by an adult.
For best results, condition all clay by running it through the Clay Conditioning Machine several times on the widest setting. Fold the clay in half after each pass and insert the fold side into the rollers first.
Materials:
Clays:
- Premo! Sculpey®: Wasabi - 2 oz (1 block)
- Premo! Accents: 18K Gold - 2 oz (1 block)
- Premo! Sculpey®: Orange - 2 oz (1 block)
- Premo! Accents: Purple Pearl - 2 oz (1 block)
Tools:
- Clay Conditioning Machine
- Clay Extruder
Accessories:
- Premo! Sculpey® Oval Keychain
Instructions:
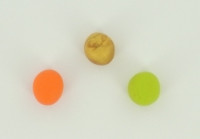
1. Remove split ring from keychain. Make a ¾" ball of Wasabi and press into oval finding. Smooth the surface.
2. Make ½" balls of Wasabi, Orange and 18K Gold clay.
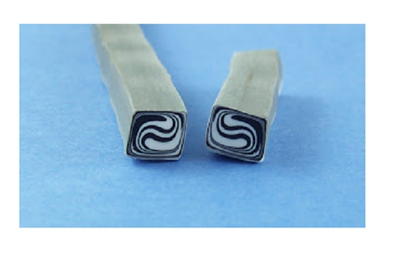
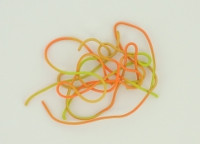
3. Assemble Clay Extruder with the large spaghetti disk (several large holes in the same disk). Add balls to barrel, alternating colors, using plunger to tamp down each color before adding the next. Fill the barrel ½ full. Extrude strings and lay out on work surface.
4. Press strings on pendant in swirls and wavy lines. Fill in with small clay balls. When surface is covered, add Purple Pearl accents. Trim edges.
5. Bake as directed above. Allow to cool completely before stringing on your cord or chain.
The smaller you make the balls, the more blending you'll have in your extruded strings.
If short strings will work for your extruding projects, the "spaghetti" disks are easier to extrude than the single-string disks.
Start the swirl between your fingers to get the center nice and tight, then press it on the base clay and continue the swirls, pressing lightly as you go.
Read NextRustic Sea Foam Faceted Bracelet