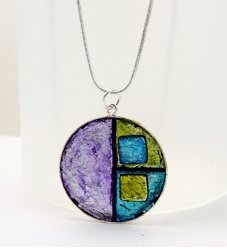
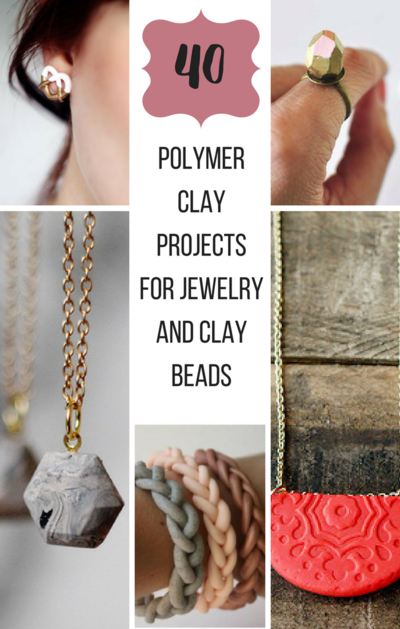
Faux Watermelon Tourmaline Pendant

The elegant Faux Watermelon Tourmaline Pendant practically radiates summer warmth and cheer. Make this adorable DIY pendant with the help of polymer clay, and bring a smile to everyone's face. If you want to learn how to make clay jewelry, you can't go wrong with this adorable little project. It's fun to make and wear, perfect for summer and every other season of the year.
Project TypeMake a Project
Time to CompleteIn an evening
Bead Project TypeOther

Getting Started:
Do not use unbaked clay on unprotected furniture or finished surfaces. Start with clean hands and work surface area. Good work surfaces include wax paper, metal baking sheet, or disposable foil. Knead clay until soft and smooth. For best results, clean your hands in between colors. Shape clay, pressing pieces together firmly. Bake on oven-proof glass or metal surface at 275°F (130°C) for 30 minutes per ¼" (6 mm) thickness. For best baking results, use an oven thermometer. DO NOT USE MICROWAVE OVEN. DO NOT EXCEED THE ABOVE TEMPERATURE OR RECOMMENDED BAKING TIME. Wash hands after use. Baking should be completed by an adult.
Begin by preheating oven to 275°F (130 °C). Test temperature with oven thermometer for perfectly cured clay. For best results, condition all clay by running it through the Clay Conditioning Machine several passes on the widest setting. Fold the clay in half after each pass and insert the fold side into the rollers first.
Materials:
Clays:
-
Premo! Accents: Translucent - 2 oz (1 block)
Tools:
- Clay Conditioning Machine
- Sculpey Acrylic Roller
- Sculpey® Clay Tool Starter Set
-
Sculpey® Super Slicer
Additional Supplies:
- Alcohol ink in Green and Pink
- 400 grit wet/dry sandpaper
- Short piece of wire
-
Round nose pliers, hammer and bench block (if available)
Instructions:
1. Roll about ¼ to ½ of the block of Translucent clay into a rectangle sheet on a medium thickness of the Clay Conditioning Machine.
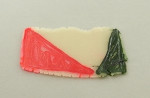
2. Paint a right triangle on one side with the Pink ink. The triangle should fill the side and bottom of the rectangle across about 2/3 of the width of the sheet. Paint a narrow Green triangle on the other side, leaving about ½“ of space between the two triangles.
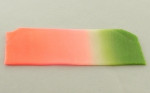
3. Allow the ink to dry, then fold and roll the clay through the Clay Conditioning Machine, folding the sheet bottom to top, and inserting the folded edge into the rollers each time. When the clay has been passed through the roller 15-20 times the color should be evenly blended from Pink to un-tinted to Green.
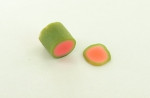
4. Rotate the sheet 90 degrees and roll through the Clay Conditioning Machine on a thin setting (about 1/16” or 1mm). Roll the sheet into a spiral with the Pink end in the middle and the Green around the outside.
5. Cut a slice from the cane about 1/8” thick. Pinch and pull the slice into a slightly irregular shape as desired. Roll across both sides with an Acrylic Roller to smooth the surface. Pierce a hole through near the top edge with the needle tool. Bake the piece according to the directions above.
6. Sand the surface lightly with wet sandpaper on both sides.
7. Form a spiral on one end of the wire. With a hammer and bench block (solid metal or wood block will do) flatten the spiral surface. Bend a 90 degree angle and insert the end of the wire through the pendant. Bend another 90 degree angle on the other side, bending the wire up toward the top. Form a wrapped loop above the upper edge of the pendant.
8. Hang the pendant on a cord or chain and head to the picnic!
Read NextHow to Make Casablanca Beads