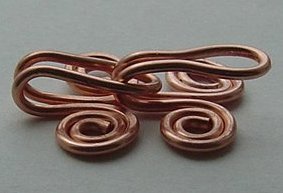
Scribbled Wire Bracelet and Earrings

Scribbled Wire Bracelet and Earrings
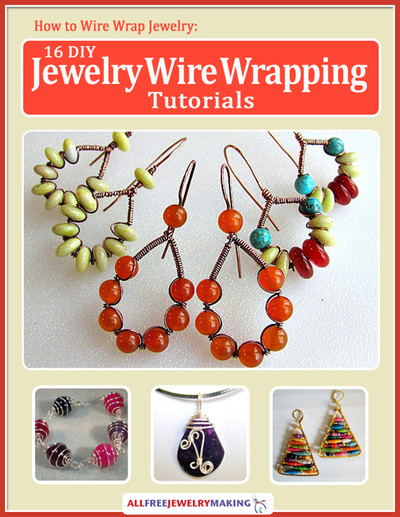
Go wild with these wavy wire jewelry patterns! This Scribbled Wire Bracelet and Earrings jewelry set introduces a whole new world of wirework. There's no right or wrong way when it comes to creating these squiggly shapes, so have fun with it!
Project TypeMake a Project
Bead TypeGlass
Time to CompleteIn an evening
Bead Technique UsedChainmail/Wirework
Bead Project TypeBracelet, Earrings

Materials:
- 180T-020 gauge Satin Brass color German style round wire
- 180R-020 20 gauge Antique Brass color German style round wire
- 180R-022 22 gauge Antique Brass color German style round wire
- 4 4mm cat’s eye glass pink faceted rondelles
- 2 4mm cat’s eye glass orange faceted rondelles
- 4 4mm cat’s eye glass puffy square beads
- 201A-104 Round nose pliers
- 201A-101 Chain nose pliers
- 228K-100 Chasing hammer (or opt for 228S-010 the nylon hammer)
- 228K-100 Steel bench block
- 228S-220 Rubber bench block
- 208F-001 Designer wire rounder
Instructions:
-
Cut off a 3.5” segment of satin brass wire. Turn a loop in one end using round nose pliers. Use chain nose pliers to form bends in wire, overlap some bends, make some loops and continue this process until reaching the end of the wire, form a second loop with round nose pliers.
-
Use hammer and bench block to flatten wire shape. Hit the wire several times on both sides until it is work hardened using firm strokes, don’t hit too hard or be too timid!
-
Use chain nose pliers to turn the loop on one end of the shape so it is perpendicular to the first loop.
-
Create 6 hammered segments. They should each be approximately 1.5” long when finished. Make two others for the earrings using 3” segments of wire, keep loops flat on these segments. These should be 1” long when finished.
-
Use a small permanent marker or other 8mm dowel to form the curve in a hook by bending wire over the curve, leave a longer tail of wire on one side than the other. Make a small loop in one end using round nose pliers and turn a smaller loop in the opposite end. You can bend and form the loop in the longer wire end into a freeform shape as in the photo. This will be the clasp for your bracelet. Use hammer and bench block to flatten and work harden clasp.
-
Take a 1.5” segment of 22 gauge aged brass wire and use it to wire wrap beads between one of the looped curves on a freeform shape. Anchor bead on both sides with three tight wraps. Cut off excess wire and tuck tail under with chain nose pliers. Make 2 green, 2 orange and two pink shapes. Attach a green bead to each of your earring shapes using the same process.
-
Use 20 gauge aged brass wire and pink rondelles to create two coiled loops with small loops on the end to secure the beads. These will dangle from your earrings.
-
Make earring hooks with the 20 gauge aged brass wire and the 10mm dowel. These use 1.5” wire segments looped on one end, bent over dowel at the center and gently curved on the end that enters the ear. Use a wire rounder to smooth wire ends. Hammer arc of curve with hammer and bench block.
-
To put it all together, attach the bracelet segments by opening, attaching and securely closing the loops on each link segment with chain nose pliers. The flat loops are attached to the perpendicular loops; this allows the bracelet to fit nicely around the wrist without flipping.
-
Attach the clasp on one end of the bracelet. The loop on the opposite end needs to be large enough to accommodate your clasp.
-
To make the earrings, secure ear wires to top of shape opening and closing the loops with chain nose pliers and attach beaded coils on bottom by opening and closing the loops. Check back through the design to be sure all loops are properly secured and all wire tails are properly tucked under to prevent discomfort when wearing.

Thanks for your comment. Don't forget to share!
Report Inappropriate Comment
Are you sure you would like to report this comment? It will be flagged for our moderators to take action.
Thank you for taking the time to improve the content on our site.