Classic Pearl Bracelet

If you're looking for simple bead weave patterns, take a look at this Classic Pearl Bracelet. It's simple and quick to create and, because of it's neutrality, is the perfect accessory to go along with any outfit.
Project TypeMake a Project
Bead TypePearl
Time to CompleteIn an evening
Bead Technique UsedStitched
Bead Project TypeBracelet

Materials:
- Nylon thread, approx 60cm.
- Freshwater pearls, rice shape.
- Jump Rings x 2
- Clasp
- Bead Tips (aka clamshells) x2.
Instructions:
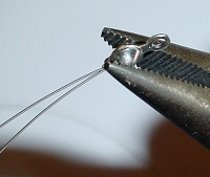
- Cut your 60cm piece of nylon in two, and tie a knot at one end. Slide on your bead tip.
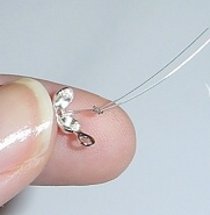
- Cut the excess nylon off, and dab a small amount of super clue on the knot. Close your bead tip using either your fingers or a pair of pliers. See picture.
- Thread a pearl on each of the pieces of nylon, and pull them close to the bead tip.

- Add another pearl to one of the strands of nylon. Then, take the other strand of nylon and thread it the OPPOSITE way through the pearl. See photo.
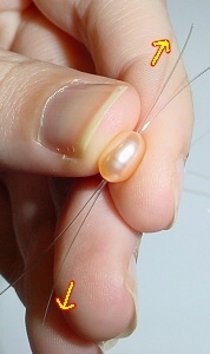
- Then pull the two ends of the nylon, so that the pearl sits closely to the first two pearls.
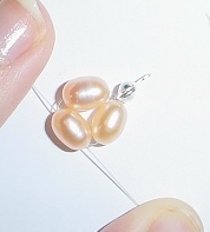
- Add two more pearls, one to each strand, then repeat step 4 & 5.
- Continue this process until you have reached your required length, or until all the pearls are used.
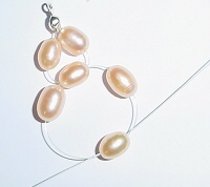
- When you have reached the end, add your bead tip.

- Tie a knot around a pin, then pull the pin as close to the beads/bracelet as possible. See photos.

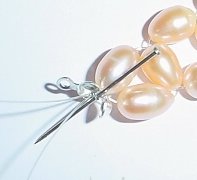
- Pull out the pin, and pull the knot tightly (using pliers to pull the knot close to the beads as you do this will help). Snip off the excess nylon, add a dab of superclue to the knot and close the bead tip.
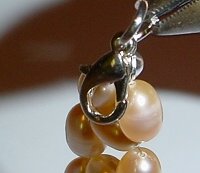
- Now add a jump ring to each bead tip. And on one end, add the clasp to the jump ring, see photos.
- Close the jump ring, and you're finished!
Read NextMermaid Magic DIY Bracelet
Your Recently Viewed Projects
Thanks for your comment. Don't forget to share!
ridiculosity 67303 43
Oct 11, 2015
The directions say to cut the nylon in two pieces. Are they equal pieces? When do you use the 2nd piece of nylon? Where do you attach it, if at all? Looks like it might be a pretty bracelet if the directions were in English.
Editor LP
Oct 12, 2015
Hi there, You cut the nylon in two pieces and then tie those two pieces together in a knot, then slide on your bead tip. The nylon pieces should be of equal length, but you can always cut off excess nylon at the end (step 10) if you have extra. We hope this helps! I might also suggest that you try posting a question for tips and tricks to our sites Facebook page. It is monitored by our editors and is a great resource for helpful tips and suggestions from our Facebook friends perhaps they can offer some additional guidance. Here is the link http//www.facebook.com/AllFreeJewelryMaking Best of luck and happy jewelry making!
Report Inappropriate Comment
Are you sure you would like to report this comment? It will be flagged for our moderators to take action.
Thank you for taking the time to improve the content on our site.