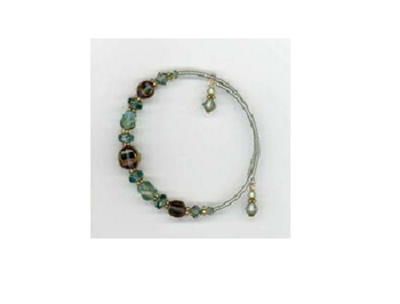
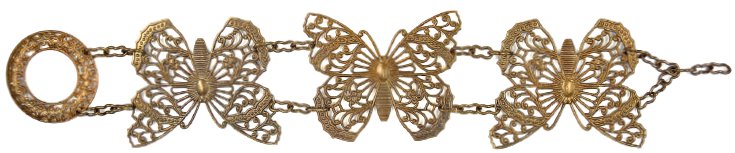
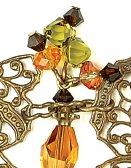
Flight of Fancy Butterfly Bracelet

With flourishes of filigree and clusters of crystals, the Flight of Fancy Butterfly Bracelet is the jewelry tutorial of your dreamiest fashion fantasies. Featuring not one but three filigree butterfly components, this beautiful bracelet pattern evokes sensations of spring. If you're an admirer of vintage aesthetic, this bracelet tutorial will tickle your fancy. Learn how to make jewelry that marries the antique and the contemporary seamlessly with these DIY bracelet instructions. The sparkling Swarovski crystals and shimmering WireLace really bring these butterflies to life.
Project TypeMake a Project
Bead TypeCrystal
Time to CompleteIn an evening
Bead Technique UsedChainmail/Wirework
Bead Project TypeBracelet

Materials:
- 12 inches 6mm WireLace®
- three 38x46mm filigree butterflies
- one 19x16mm filigree leaf
- one 28mm scrolled filigree ring
- one 15x10mm swirl drop
- two 2-inch headpins
- 15 1-inch headpin
- four 6mm flower spacers
- 6 inches 4x7mm chain (27 links)
Swarovski Elements:
- one 20mm Art. 6906 Lily
- two 12x8mm Art. 5203 Polygon
- three 20x9mm Art. 3254 Leaf
- 10 6mm Art. 5040 Roundel
- 10 6mm Art. 6301 Top-drilled Bicone
- 19 4mm Art. 5301 or 5328 Bicone
- six PP15 Art. 1028 Chaton
Tools:
- wire flush cutters
- scissors
- two chain-nose pliers
- one round or needle-nose pliers
- two-part all purpose clear drying epoxy
- GS hypo-cement
- toothpicks
- bead stopper or paperclip
- Isopropyl alcohol and soft cloth for removing excess glue (optional)
Instructions:
-
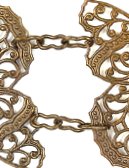
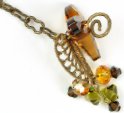
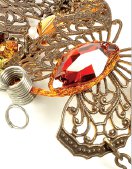
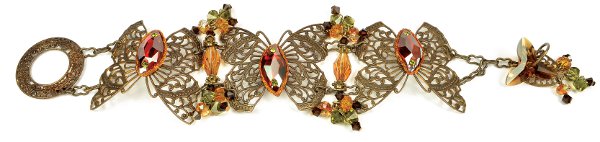
Use three chain links to attach pieces together as shown in the full-length picture below. Note that the center butterfly is the opposite direction of the outer two. It is important to connect the butterflies in the exact openings shown in the close-up picture below.
-
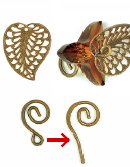
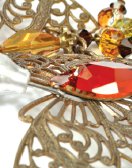
Unbend the small loop on the Swirl Drop. Slide on Lily Crystal and filigree leaf and make a loop.
-
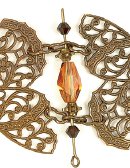
Between butterflies, add crystal connectors: Cut the "head" off of a 2-inch headpin and make a loop on the end. Add one 4mm Bicone; insert through center chain link. Add a flower spacer, Polygon crystal, and flower spacer, and then go through the opposite center chain link. Finish with another 4mm Bicone and make a loop to close the end.
-
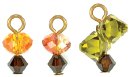
With 1-inch headpins, make five of each dangle (15 total) and attach to each loop and filigree leaf.
• 4mm Bicone, 6mm Roundel (five of each color)
• 4mm Bicone, two 6mm Top Drilled Bicones
-
Using your fingers, bend the butterflies to fit your wrist. Confirm length to adjust chain links on end and attach leaf toggle. Bend the leaf by squeezing the sides together to fit through the filigree ring.
-
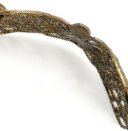
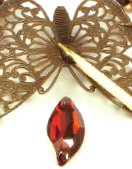
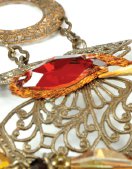
Mix epoxy according to manufacturer's instructions and spread a thick layer across the entire length of the body of the butterfly. Set Leaf Crystal with tapered curve tip toward the antenna. Position on body and press. A little glue should seep out around the edge; if not, quickly remove and add more glue. Let dry.
-
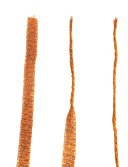
With scissors, cut three 4-inch pieces of 6mm WireLace®. Using your fingers, twist each piece down to create a cord.
-
Apply a liberal stream of GS hypo-cement glue around the entire base of the crystal. If there wasn’t enough epoxy used in step 6, then you’ll need more glue as it will flow under the leaf crystal.
-
Start at the top (antenna) and wrap clockwise one and a half times to finish at the opposite end. Gently press the WireLace® cord into the crevice with a wooden toothpick or similar. If your cord sinks into the crevice, you can continue wrapping to do two full wraps around the leaf crystal.
-
Hold the WireLace® cord in place with a bead stopper or paperclip to dry. Gently press the cord into the crystal to ensure adhesion. Add a little GS hypo-cement glue where the WireLace® cord will trim off.
-
Using sharp flush-cut wire clippers, cut the WireLace® cord on an angle as close to where the cord is glued as you can get. After cutting, add a dab of cement glue to the end and press into the cord. If you feel the cord is not adhered, add a touch of cement glue and let dry.

-
Because the crystal is recessed into the hole, use a dab of cement glue in the hole and place in the Chaton crystal. Use tweezers or try rolling a piece of tack-it putty (the removable kind used for holding posters onto walls) onto a toothpick and using it to place the crystal. For an absolute permanent bond, use epoxy.

Read NextDancing Beads DIY Bracelet
Your Recently Viewed Projects
Thanks for your comment. Don't forget to share!
mulberrygalprinces s
Aug 27, 2018
This is gorgeous. It's got such an old world look. Or Victorian if you like. The written directions along with all the pictures really helps in the making process. This would make a beautiful gift for a friend or family member. I know my sister in law would love it.
Report Inappropriate Comment
Are you sure you would like to report this comment? It will be flagged for our moderators to take action.
Thank you for taking the time to improve the content on our site.