How to Make a Wire-Wrapped Bead Link
By: Soft Flex Company
How to Make a Wire-Wrapped Bead Link
If you're interested in learning how to make wire jewelry, begin your education here with How to Make a Wire-Wrapped Bead Link. This basic wire-wrapping technique will come up again and again as you explore wire jewelry tutorials, so it's best to master the steps early on. Wire-wrapped bead links will become important building blocks in many of your jewelry designs, allowing you to connect and expand your pieces. Figure out the fundamentals with this beginner wire-wrapping tutorial.
Project TypeLearn a Technique
Bead TypeMiscellaneous
Time to CompleteUnder an hour
Bead Technique UsedChainmail/Wirework
Instructions:
-
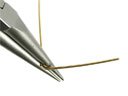
Using a pair of round nose pliers, take your wire and make a right angle.
-
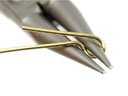
Next, using your pliers as a “form,” gently wrap your wire from the base around the form, using your fingers or chain nose pliers.
-
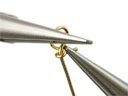
As needed, adjust your pliers to allow the wire to make a complete circle as the tail of the wire comes up next to the right angle. You should now have a complete circle, and the tail should be ready to make a coil. (NOTE: Before doing step 4, you would secure your chain, clasps, etc., at this point.)

-
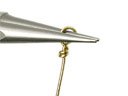
Hold your circle with pliers in one hand to keep it from bending or becoming misshapen while you make your coil. In the other hand, using your chain nose pliers, take the tail end of the wire and wrap it firmly around the shank, making horizontal coils. Usually two coils looks best, but it is completely your preference to use more or fewer coils. Snip the end of the wire off and bend the end down with pliers, if necessary.
-
You should now have a completed wire-wrapped loop that looks like the photo below.

-
Next, place your bead onto the shank. You are going to repeat steps 1 through 5 for the opposite end of the wire. This will make it so that you can connect the piece at both ends.