Personalized Dog Tag Necklace Tutorial
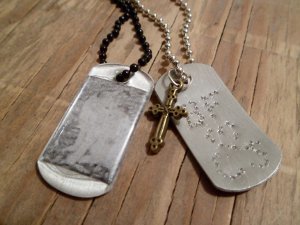
Need a thoughtful gift idea for a friend or loved one? Follow this Personalized Dog Tag Necklace Tutorial and give them a present that is perfectly customized for their personality. It can be hard finding free jewelry patterns that are appropriate for men, but this necklace tutorial would make a great gift for men or women. These free jewelry instructions will walk you through two different ways to transform a dog tag pendant: with basic metal stamping techniques, or with an image and a resin dot.
Project TypeMake a Project
Bead TypeMetal
Time to CompleteUnder an hour
Bead Technique UsedMetalwork
Bead Project TypeNecklace

Materials List
- For Punched Design:
- dog tag pendant
- ball chain necklace
- nail
- hammer
- surface to hammer on
-
optional: a charm
- For the Resin Dot Design:
- dog tag pendant
- epoxy resin dots for dog tags
- ruler
- paper plate and toothpicks
- epoxy or some other type of strong glue
- an image (I printed mine out)
- ball chain necklace
Instructions
Instructions for Punched Design:
-
Peel away the plastic on the dog tag (both sides).
-
Lay out your design on the dog tag pendant. You can use the nail to lightly scratch the surface.
-
Using the nail and the hammer, start creating dots along the lines you made in the previous step. The depth of the dots and the distance is up to you. The pendant will curve a little after pounding it, but I like it like that. If you wanted, you could try and bend it back flat.
-
Just string the pendant on the necklace, and you’re all set! If you wanted to, you could add a charm like I did.
*Some more ideas for personalizing: punching names, initials, a heart, a date, or a special symbol.
Instructions for Resin Dot Design:
-
Peel away the plastic on the dog tag (both sides).
-
To determine the size of your image, measure your dog tag pendant. I wanted mine to be in the center, so I needed an image that was ¾ inches by 1 inch.
-
Resize your image according to your measurements, and then print it out on cardstock. If you have a photo, just cut it down to size. Test to see if the image fits nicely on the pendant and trim accordingly.
-
Take a tiny amount of epoxy and apply it to the image. Align your image with the pendant and press firmly in place. Wipe away any excess glue. I used my fingers to do this which isn’t recommended—try using a cotton swab. If you do get epoxy on your hands, wash your hands immediately afterwards. Let dry before moving on to the next step.
-
To apply the epoxy dot to the pendant, just peel away the backing and stick it on the pendant like a sticker. Be careful not to touch the sticky part of the epoxy dot and take your time aligning it with the pendant. Press firmly down to adhere it well to the pendant.
-
Just string the pendant on the necklace, and you’re all set!
*Some more ideas for personalizing: favorite sports team’s logo, a photo, or a meaningful symbol.
Your Recently Viewed Projects
Laura P
Jan 19, 2016
It is so hard to find DIY jewelry projects for men! If you are looking for gifts for boyfriend for Valentine's Day, this unique necklace would be a lovely, personalized present!
Report Inappropriate Comment
Are you sure you would like to report this comment? It will be flagged for our moderators to take action.
Thank you for taking the time to improve the content on our site.

