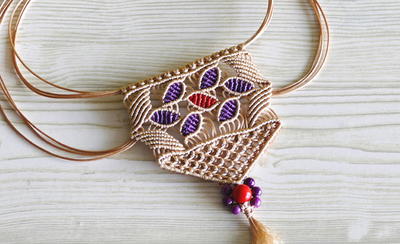
Free Beading Pattern for Bridal Jewelry

This Free Beading Pattern for Bridal Jewelry gives you a complete set: earrings, necklace, and bracelet. It is such a simple and elegant design that you can easily make it and everyone would think it was store-bought.
Project TypeMake a Project
Bead TypePearl
Time to CompleteIn an evening
Bead Technique UsedChainmail/Wirework
Bead Project TypeNecklace, Bracelet, Earrings

Materials:
Necklace
- .015" diameter silver Beadalon 19 JW14S-0
- silver medium curb chain 340B-030
- silver elongated cable chain 340B-010
- 12 silver #1 crimp beads JFC1S-1.5G
- 12 silver lines crimp covers (variety pack 349B-101)
- 12" freshwater pearl strands: 5x6mm amethyst rice, 5x6mm white rice, 6mm white potato, 6mm amethyst potato, 8mm white potato
- 2 white 12mm round glass pearls
- 4 silver 8mm jump rings
- 2 silver 18mm bead rings
- silver 3-loop end bars
- silver 3-loop end bars with clasp/extension chain attached
Bracelet
- 2 loops of bracelet-size memory wire
- 32 silver eye pins
- leftover freshwater pearls from the necklace: 5x6mm amethyst rice, 6mm white potato
Earrings
- 2 silver 25mm kidney ear wires 308B-310
- 2 silver medium ball head pins 312B-253
- 2 white 12mm round glass pearls
- 2 silver 18mm bead rings
Tools
- Round nose pliers
- Chain nose pliers
- Wire cutters
- Crimping tool
- Memory wire cutters
Instructions:
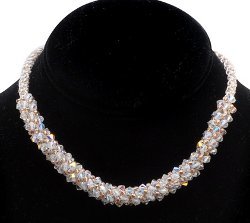
For the necklace
-
Cut a 8" length of beading wire and use a crimp bead to attach it to a loop on the end bar. Attach a crimp cover. Pass it through 7" of pearls. Crimp to attach it to a loop on the other end bar. Repeat this step to connect two beaded strands to each loop on the end bars.
-
Cut two 7" lengths of elongated cable chain and one 7" length of curb chain. Open the end links to attach an elongated cable chain to each of the outer loops on the end bar. Attach the curb chain to the inner loop.
-
Place a 12mm pearl in the center of a bead ring and pass an eye pin through both items. Make a simple loop. Repeat this step for a matching pearl/bead ring link.
-
Connect two jump rings to each silver bead ring.
-
Cut six 3 ½" lengths of both styles of chain.
- Assemble each side of the necklace as follows: Use a jump ring to attach the end bar loop (on the beaded section) to a silver bead ring. Attach another jump ring to the silver bead ring and connect it to the loop on a pearl/bead ring link. Use another jump ring to connect a silver bead ring to the other end of the pearl/bead ring link. Gather three chains of each style together and use a jump ring to connect them to the last silver bead ring. Open the last links on the chains and attach one of each style to a loop on the end bar/clasp.
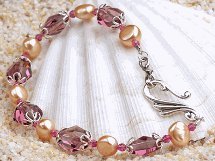
For the bracelet
-
String an amethyst pearl onto each eye pin and make a basic loop. Adjust the loops so they are facing the same direction. (You don't want one loop facing the front and one loop facing the side.)
-
Make a loop on the end of both pieces of memory wire.
-
String a white pearl onto each wire. String an amethyst pearl link onto the wires by passing one wire through the upper loop and the other wire through the lower loop.
-
Alternate white pearls and amethyst pearl links until all of the white pearls are strung.
-
Loop each wire after the last white pearls, making sure that the beads are snug.
-
Open a loop on the last amethyst pearl link and connect it to the two lower loops on the end of the memory wire.
- Connect the other end of the amethyst pearl link to the upper loops on the end of the memory wire.
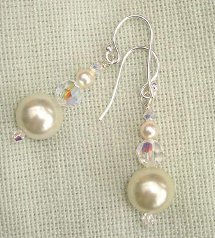
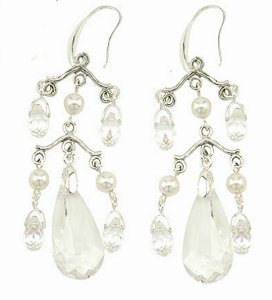
For the earrings
-
Place a 12mm pearl in the center of a bead ring and pass a head pin through both items.
-
Make a wrapped loop to attach the beaded dangle to an ear wire.
- Repeat Steps 1-2 to make a matching earring.
Read NextElegant Amethyst Bracelet
Your Recently Viewed Projects
Thanks for your comment. Don't forget to share!
mandysue22 2131702
Oct 08, 2012
So classy and upscale. I am always asked to make many different styles of Pearl Jewelry. This really gave me new pattern/ideas that I cannot wait to get started on.
Report Inappropriate Comment
Are you sure you would like to report this comment? It will be flagged for our moderators to take action.
Thank you for taking the time to improve the content on our site.