Zuri DIY Necklace

This Zuri DIY Necklace is a tribal accessory that brings out the best of natural gemstone. The rough hewn stone beads and pendants give the piece a dynamic and natural look that stands out with any outfit. Plus, the matte and metallic colors make up a beautiful palette for autumn wear. With gold pendant and turquoise stone accents, this collar necklace is a royal accessory and easily made DIY statement necklace for fall. Especially when it comes to fall fashion, handmade necklaces are always on trend. Check out this tutorial for full instructions!
Project TypeMake a Project
Bead TypeGemstone
Time to CompleteUnder an hour
Bead Technique UsedStrung
Bead Project TypeNecklace

Materials:
- 1 pk #34718001 100in Small Oval Chain Antique Gold
- 1 pk #34719005 135pc Head Pin-Eye Pin Gold
- 1 pk #72099564 15x20mm Asymmetrical Turquoise Gemstone Strand - 15in
- 5 pk #34746064 1pc Pencil Gemstone Pendant - Gold
- 4 pk #34741041 32pc 10mm Rondelle Mirror Beads - Gold - Purple
- 1 pk #34733035 40g Brown 11-0 Seed Beads
- 1 pk #34719012 8 Set 2-Strand Toggle Gold
- 1 pk #34719018 500pc 2mm Crimp Tube-Bead Antique Gold
- 3-in-1 Tool
- Crimping Pliers
Instructions:
1. Cut a 1 1/2 in. (3.8cm) piece of 22 gauge wire. On one end, make a plain loop. String a pencil pendant and make a plain loop. Make three pencil connectors.
2. Cut a 2in. (5 cm) piece of 22 gauge wire. On one end, make a plain loop. String a rondelle, a pencil pendant, and a rondelle. Make a plain loop. Make two multi-bead connectors.
3. On a head pin, string an 11 aught seed bead and a rectangle bead. Make a plain loop. Make 32 bead units.
4. Open the loops of a multi-bead connector and attach two bead units to one loop and one bead unit to the other. Close the loops. Make a second connector the mirror image of the first.
5. Cut two 18 link pieces of chain. On each chain, skip a link and attach a bead unit. Attach four more bead units, skipping two links between each, leaving an empty link on the end. Repeat with two 21 link chains, each with seven bead units.
6. Open a jump ring and attach an end link of an 18 and a 21 link chain and a loop of a pencil connector. Repeat on the other loop of the pencil connector.
7. On each side, use a jump ring to attach the end link of each chain and a loop of a pencil connector.
8. On each side, open the remaining loop of the pencil connector and attach the loop of a multi-bead connector from step 4.
9. Cut a 13 in (33cm) and a 14in (36cm) piece of beading wire. On the shorter wire, string a rondelle, a crimp tube, and the remaining loop of the multi-bead connector. Go back through the beads just strung and tighten the wire. Repeat with the longer beading wire, attaching it below the shorter wire. Repeat on the other side.
10. On each end, string rondelles until the strand is within 1in. (2.5cm) of the finished length. String a crimp tube and the corresponding loop of half of a toggle clasp. Check the fit and add or remove beads if necessary. Go back through the beads just strung. Tighten the wire, make a flattened crimp, and trim the excess wire.
Read NextHardware Store Rose Gold Necklace
Your Recently Viewed Projects

Thanks for your comment. Don't forget to share!
Hippie Chick
Apr 18, 2018
When finished, this makes a beautiful necklace. It is not one of those quicky projects because you will be spending a little quality time stringing this one together, but it looks like it will be well worth the effort that you put into it. The instructions are easy to follow, but the project will take some time.
margiekins22
Jul 27, 2016
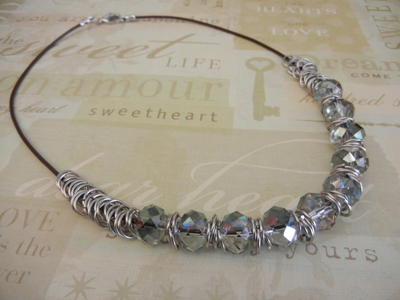
This is a gorgeous crystal necklace! I like how it's colorful which is different than your typical blingy crystal jewelry!
Report Inappropriate Comment
Are you sure you would like to report this comment? It will be flagged for our moderators to take action.
Thank you for taking the time to improve the content on our site.