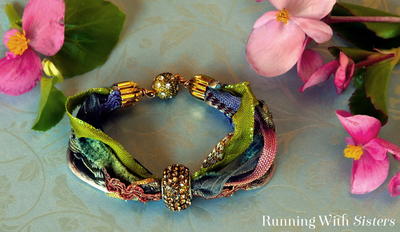
Crystal Ribbon Wrap Bracelet

Wrap your wrist in a swirl of sparkling crystals and colors with this Crystal Ribbon Wrap Bracelet tutorial. If you don't have many jewelry making supplies but still want to find cool bracelets to make, then this pretty project will be perfect for you. All you need is a needle and thread to make this magical wrist adornment. These DIY jewelry instructions are designed to create a bracelet that wraps around your wrist twice, but you can adjust the length to suit your own style. Make a statement with this unique wrap bracelet made using crystals from Create Your Style with Swarovski Elements.
Project TypeMake a Project
Bead TypeCrystal
Time to CompleteIn an evening
Bead Project TypeBracelet

Materials:
Create Your Style with Swarovski Elements™:
- 4mm Bicone, Amethyst #56-05256 (1 pkg)
- 4mm Bicone, Olivine #56-05207 (1 pkg)
- 4mm Bicone, Smoked Topaz #56-05334 (1 pkg)
- 4mm Bicone, Crystal AB #56-05282 (1 pkg)
Other supplies:
- toggle clasp
- ribbon (51 inches)
- jewelry wire (12 inches)
- sewing thread
- round-nosed pliers
- flat-nosed pliers
- wire snips
-
beading needle
Instructions:
-
Cut the ribbon into thirds and tie a tight knot connecting the three pieces together at one end. Try to get your knot as close to the end as possible.
-
Smooth out the ribbon and make sure the pieces are even (trim excess if needed). Tie another knot at the other end of the ribbon, connecting the three pieces.
-
Tie three evenly spaced knots along the length of the ribbon. Make sure the knots are tight. The length of the ribbon should now be about 13 inches.
-
Cut the jewelry wire in half.
-
Feed one piece of wire through one of the end knots on the ribbon so that the knot is in the center of the wire length (this should be a tight squeeze to get the wire through the knot).
-
Holding both the knot and wire in your flat-nosed pliers, begin to wrap the wire as tightly as possible around the ribbon in toward the bracelet. The wire wrapping should start next to the knot.
-
Continue wrapping tightly until the wire seems secure around the ribbon (about 1/4 inch of wrapping).
-
Carefully snip the wire off as close to the ribbon as possible. Bend back the end so the wire lies smoothly against the ribbon.
-
Using the round-nosed pliers, make a bend in the remaining wire that is sticking out, about 1/4 inch from the knot. The bend should look like a horseshoe, leaving the end of the wire facing back toward the bracelet.
-
Feed one end of the toggle onto the wire loop.
-
Hold the wire loop in the flat-nosed pliers and tightly wrap the remaining wire, starting at the ribbon knot and working back towards the toggle. Wrap tightly until you get to the toggle, leaving room to allow the toggle to still move freely.
-
Snip the excess wire and bend back the end.
-
Repeat steps 5-12 on the other end of the bracelet with the other toggle piece.
-
Use Amethyst, Olivine, and Smoked Topaz bicones for steps 15-16.
-
Thread your beading needle with sewing thread and tie a knot in the end. Feed the needle and thread through one of the center knots in your ribbon. Feed a crystal onto your needle and thread and go back down through the knot to secure it. Continue this process, surrounding the knot with crystals.
-
Repeat step 15 on the other two knots. Make sure all thread ends are knotted and trimmed.
- Use the sewing thread and beading needle to sew Crystal bicones along the length of the ribbon pieces. Space the bicones as desired. Make sure all thread ends are secured and trimmed.
Note: These instructions are based on an average 7-1/2-inch wrist. You can adjust the length longer or shorter for your wrist size if needed. The bracelet is intended to be wrapped around your wrist two times.
Read NextPandora Ribbon DIY Bracelet
Your Recently Viewed Projects
Thanks for your comment. Don't forget to share!
mulberrygalprinces s
Jun 07, 2017
I agree with the others. Usually if I find directions confusing or hard to follow, I can just look at the picture. In this case the picture is not very helpful. It's a real shame because I bet it is very pretty. Thank you for sharing anyways, maybe the designer could update the picture with a clearer one?
Editor EK
Jun 08, 2017
Hello mulberrygalprincess, Thank you for your feedback on the picture! Unfortunately, there are no other pictures of this project, but we will keep your feedback in mind when selecting full projects to upload on to AFJM. - Editors of AllFreeJewelryMaking
maryarmbrust14 140 9921
Mar 28, 2016
This bracelet looks really cute although hard to see the detail in the photo provided. Also, instructions are confusing and since I don't have a good picture of the finished product to refer to, I won't be attempting to make this "so called" easy, "make it in an evening" bracelet. -( So bummed.
Report Inappropriate Comment
Are you sure you would like to report this comment? It will be flagged for our moderators to take action.
Thank you for taking the time to improve the content on our site.