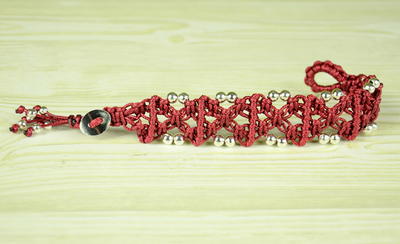
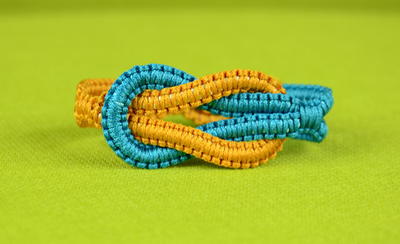
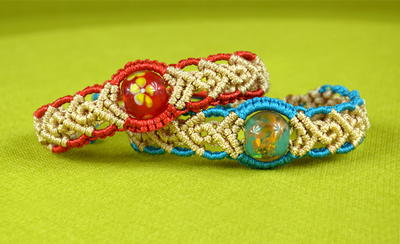
Double Helix Friendship Bracelet Pattern

Double Helix Friendship Bracelet Pattern
Inspired by the shape of DNA, this Double Helix Friendship Bracelet Pattern features two intertwined coils. Your friends will love the intricacy of this macrame bracelet pattern and won't believe it took you under an hour to make!
Project TypeMake a Project
Time to CompleteUnder an hour
Bead Project TypeBracelet

Notes:
- Before you begin making your friendship bracelet, you should know how to make a Right Hand Double Knot and Left Hand Double Knot. You can see these instructions at myfbm.com.
- These instructions teach you how to complete the pattern using My Friendship Bracelet Maker. However, the pattern can be completed without the loom as well.
Instructions:
-
Pick 4 different colors. (The example uses dark purple, light pink, black & green. Using these colors will make it easier to follow the video.)
-
Align string, fold in half, and tie knot ½ inch from fold forming a loop.
-
Attach your ½ inch loop to MYFBM under the butterfly clip.
-
Separate strings by placing one string per slot. Note: Use the same color in slots 2 &3 (dark purple), slots 4 & 6 (light pink), slots 5 & 7 (black) & slots 8 & 9 (green). This will align the colors of your bracelet pattern.
-
To begin, take string #4 (light pink) and make a right hand double knot with string #5 (black). String #4 (light pink) will now be in slot 5.
-
Take string #6 (light pink) and make a right hand double knot with string #7 (black). String #6 (light pink) will now be in slot 7.
-
Use string #6 (now black) and make a left hand double knot with string #5 (light pink). String #6 (black) will now be in slot 5.
-
Next, take string #2 (dark purple) and make 3 right hand double knots. One each, on string #3 (dark purple), string #4 (black) & string #5 (black).
String #2 (dark purple) will now be in slot 5.
-
Take string #2 (dark purple) and make 2 right hand double knots. One each, on string #3 (black) & another on string #4 (black). String #2 (dark purple) will now be in slot 4.
-
Use string #2 (now black) and make a right hand double knot with string #3 (black). String #2 (black) will now be in slot 3.
-
Move to the other side and use string #9 (green) and make 7 left hand double knots. One each, on string #8 (green), string #7 (light pink), string #6 (light pink), string #5 (dark purple), string #4 (dark purple), string #3 (black) & string #2 (black). String #9 (green) will now be in slot 2.
-
Take string #9 (green) and make 6 left hand double knots. One each, on string #8 (light pink), string #7 (light pink), string #6 (dark purple), string #5 (dark purple), string #4 (black) & string #3 (black). String #9 (green) will now be in slot 3.
-
Use string #8 (light pink) and make a right hand double knot with string #9 (light pink). String #8 (light pink) will now be in slot 9.
-
Take string #7 (dark purple) and make 2 right hand double knots. One each, on string #8 (light pink) & another on string #9 (light pink). String #7 (dark purple) will now be in slot 9.
-
Now take string #6 (dark purple) and make 2 right hand double knots. One each, on string #7 (light pink) & another on string #8 (light pink). String #6 (dark purple) will now be in slot 8.
-
Use string #6 (light pink) and make a left hand double knot with string #5 (black). String #6 (light pink) will now be in slot 5.
-
Take string #4 (black) and make a right hand double knot with string #5 (light pink). String #4 (black) will now be in slot 5.
-
Take string #6 (black) and make a right hand double knot with string #7 (light pink). String #6 (black) will now be in slot 7.
-
Use string #6 (now light pink) and make a left hand double knot with string #5 (black). String #6 (light pink) will now be in slot 5.
-
Next, take string #2 (green) and make 3 right hand double knots. One each, on string #3 (green), string #4 (light pink) & string #5 (light pink). String #2 (green) will now be in slot 5.
-
Take string #2 (green) and make 2 right hand double knots. One each, on string #3 (pink) & another on string #4 (pink). String #2 (green) will now be in slot 4.
-
Use string #2 (now light pink) and make a right hand double knot with string #3 (light pink). String #2 (light pink) will now be in slot 3.
-
Move to the other side and use string #9 (dark purple) and make 7 left hand double knots. One each, on string #8 (dark purple), string #7 (black), string #6 (black), string #5 (green), string #4 (green), string #3 (light pink) & string #2 (light pink). String #9 (dark purple) will now be in slot 2.
-
Take string #9 (dark purple) and make 6 left hand double knots. One each, on string #8 (black), string #7 (black), string #6 (green), string #5 (green), string #4 (light pink) & string #3 (light pink). String #9 (dark purple) will now be in slot 3.
-
Use string #8 (black) and make a right hand double knot with string #9 (black). String #8 (black) will now be in slot 9.
-
Take string #7 (green) and make 2 right hand double knots. One each, on string #8 (black) & another on string #9 (black). String #7 (green) will now be in slot 9.
-
Now take string #6 (green) and make 2 right hand double knots. One each, on string #7 (black) & another on string #8 (black). String #6 (green) will now be in slot 8.
-
Use string #6 (black) and make a left hand double knot with string #5 (light pink). String #6 (black) will now be in slot 5.
-
The pattern will now repeat itself. Repeat steps 5 – 28 until your bracelet is long enough to fit your wrist.
-
Once you bracelet is long enough to fit your wrist take three strings from the slots 2-4 in your left hand and three strings from slots 7-9 in your right hand and braid with the remaining 2 center strings.
-
Take the braided strings and tie two basic knots at the end of your friendship bracelet. (Learn how to finish your friendship bracelet with knots or beads by visiting myfbm.com.).
- Unclip your friendship bracelet from the butterfly clip and cut off the excess braided section. Your bracelet is ready to wear or share!