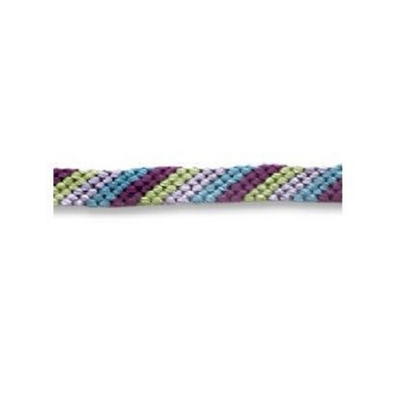
Diagonal Stripe Friendship Bracelet Pattern

The Diagonal Stripe Friendship Bracelet Pattern is the most classic of all friendship bracelet designs and one of the easiest to make. If you're new to macrame bracelet patterns, this tutorial is the perfect place to start. Once you get the hang of it, it's a breeze. You'll be making DIY friendship bracelets for all of your friends. Use this free printable jewelry tutorial to learn how to make a cool striped pattern you and your friends are sure to adore for many summers to come.
Project TypeMake a Project
Time to CompleteIn an evening
Bead Project TypeBracelet

Instructions
-
Pick up to five threads. (The more colors you choose, the wider your bracelet will be.)
-
Align string, fold in half, and tie knot 1/2 inch from fold, forming a loop.
-
Attach your 1/2-inch loop to MYFBM under the butterfly clip.
-
Separate strings by placing one string per slot.
-
Hold string #1 with your right hand and string #2 with your left hand; loop string #1 in front making a number “4."
-
While holding string #1 and #2, continue the steps to form a right handed double knot. After double knot is complete, move #2 string to #1 slot while holding string #1 in hand. Take string #1 and make the same right handed double knot around string #3. After double knot is complete, move string #3 to the #2 slot. Continue to tie right-handed double knots on string #4 through #10 with string #1 until you finish the row. When you've completed tying the double knot on string #10, place string #1 into slot #10 on your MYFBM.
-
When you have completed step 6, you have finished your first stripe! Repeat steps 5 and 6 with your new #1 string and watch your bracelet grow!
-
When you think your bracelet is long enough to fit around your wrist, hold three strings from slots #1, #2, and #3 with your left hand and three from slots #8, #9, and #10 with your right hand. Braid the three strings from your left hand and right hand with the four strings left in slots in #4, #5, #6, and #7.
-
Take the braided strings and tie two basic knots at the end of your friendship bracelet. (Learn how to finish your friendship bracelet with knots or beads by visiting choosefriendship.com.)
-
Unclip your friendship bracelet from the butterfly clip and cut off the excess braided section. Your bracelet is ready to wear or share!
Tips:
-
Before you begin making your friendship bracelet, you should know how to make a Right Hand Double Knot and Left Hand Double Knot. You can see these instructions at choosefriendship.com.
-
These instructions teach you how to complete the pattern using My Friendship Bracelet Maker. However, the pattern can be completed without the loom as well.