Ming Fling Bracelet

Ming Fling Bracelet
Have you ever tried making fused glass jewelry? This Ming Fling Bracelet is a great way to start playing around with the medium. It's simple and gorgeous at the same time, so learn how to make a glass bead bracelet tonight!
Project TypeMake a Project
Bead TypeGlass
Time to CompleteIn an evening
Bead Technique UsedGlass Beadmaking
Bead Project TypeBracelet

Materials:
- Fuseworks™ Microwave Kiln
- Fuseworks™ Hot Mitts
- Fuseworks™ Kiln Paper
- Fuseworks™ Fusible Shapes Orange (2) and Dichroic Red (2)
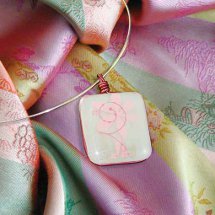
- Fuseworks™ “The Orient” Decal – Ming Vase
- Fuseworks™ Antique Copper Bracelet
- Safety Glasses
- E-6000®
- Scissors
- Bowl for water
Instructions:
- Using a glass cutter, quarter a red dichroic and an orange Fusible Shape.
- Clean glass using paper towel moistened with water. Completely dry the surface of the glass with a lint free cloth.
- Cut a 2” X 2” piece of kiln paper. Remove the lid from the Fuseworks™ Kiln. Place the kiln paper on the kiln base.
- Position one whole orange Fusible Shape in the center of the kiln paper. Cover with a red dichroic Fusible Shape.
- Carefully set the base with glass inside the microwave and cover with kiln lid. Fuse in a 1200-watt microwave at 50% for 2 minutes; 80% at 1 minute; 30 seconds. If using a microwave with a lower wattage, increase the power percentage but keep time consistent. PLEASE NOTE: All microwave and kiln combinations will have different firing patterns. Be sure to take careful notes and log all fusing times for future use.
- When time has expired, open microwave and, using Hot Mitts, carefully lift the lid enough to inspect the fusing process. The glass is fused when the edges are nicely rounded. If necessary, continue to microwave at 15-second increments until desired results are achieved.
- Remove kiln from microwave using the Hot Mitts and place on a heat resistant surface. Cool the kiln for at least 30 minutes WITH THE LID ON. CAUTION: Removing the lid or peeking under the lid during the cooling stage may result in your piece cracking. Glass remains hot for a long time handle with great care.
- Using a scissors cut out the “Ming Vase” decal and place it in a bowl of water (preferably distilled) for approximately 30 seconds. Slide the backing-paper away from the decal so it rests against the cooled glass. The decal should slide off backing-paper easily; if not, let it soak longer. Use a paper towel to pat the moisture from the decal and glass. Should air bubbles appear, push them out with your finger.
- Use the photo as a guide and apply the decal facing up. Allow it to dry completely.
- Remove used kiln paper and discard. Cut a 2” X 2” piece of kiln paper. Remove the lid from the Fuseworks™ Kiln. Place the kiln paper on the kiln base
- Place the glass with the decal in the center of the kiln paper.
- Carefully set the base with glass inside the microwave. Cover the base and glass with kiln lid.
- If using a 1200-watt microwave, fuse at 50% power for 2 minutes. Heat again, at 80% for 1 minute and 30 seconds. If using a microwave with a lower wattage, increase the time to 2 minutes and 30 seconds. PLEASE NOTE: All microwave and kiln combinations will have different firing patterns. Be sure to take careful notes and log all fusing times for future use.
- When time has expired, open microwave and, using Hot Mitts, carefully lift the lid enough to inspect the fusing process. Check your glass, if the decal appears as a white silhouette; continue fusing at 100%, adding an additional 15 seconds to the time until the decal looses the white appearance. When you are able to see the color and definition of the decal, the fusing process is complete.
- Remove kiln from microwave using the Hot Mitts and place on a heat resistant surface. Cool the kiln on a heat resistant surface for at least 30 to 40 minutes with the lid on. WARNING: Removing the lid or peeking under the lid during the cooling will result in your piece cracking. Glass remains hot for a long time handle with great caution. Cool the glass completely.
- Repeat steps 3 – 8 to fuse the quartered Fusible Shapes.
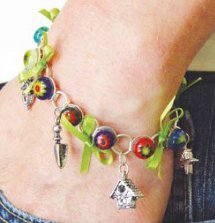
- Find the center of the bracelet and glue the glass round with decal to two of the bracelet disks. Glue two triangular shapes to either side of the round (use the photo for placement if necessary). Allow it to dry before using. Note: If necessary bracelet length can be shortened by removing links.
Read NextJust Dreaming Pendant